One thing about getting older as a software person is that you get to see certain things fade out of fashion, largely because something better has come along, or the solution is no longer necessary. True to form for tech, a lot of babies get thrown out while discarding the bathwater. The shell is a great example of this; many things have been partially lost to time as shells improved, better shells were made the default on operating systems, as well as the requirement for a minimal shell decreased as computing resources got larger. Still, however, the shell remains something we must all use, and to share our shell scripts with others, we must take certain precautions. This article covers several of them. You may have seen some of these before, but by and large, all of them should be used in any shell script you write.
A lot of Linux users are very familiar with the venerable “Bourne Again Shell” or bash. It is more often than not (with a few exceptions, some use ash/dash-based shells) the standard/default shell on any given Linux distribution, with its own symlink to /bin/sh. On BSD systems, Solaris/Illumos, and other unixes, /bin/sh is frequently its own animal, closer in target to the ash derivatives on Linux than bash. bash has very different semantics than a more classically styled Bourne Shell, and the differences can trip a lot of folks up. For example, /bin/[ is symlinked to /bin/test and that’s because those aren’t built-ins in a lot of standard Bourne Shells; those are actually programs you execute while you’re running the script.
This article does expect you have a basic familiarity with Bourne Shells as well as scripting languages in general.
/usr/bin/env is here to save you
So I guess the first thing we should cover is situations where you know you need something like bash, or maybe even something more esoteric like zsh, and want to keep your script portable, so you do this:
1
#!/bin/bash
Which is wrong. On BSDs and older unixes (although Solaris is in /bin IIRC), bash is usually in /usr/local/bin/bash, which is not where this script points. This script will not run on BSD without a symlink manually added. The easy way to do this is by invoking bash from the $PATH, which can be done like this:
1
#!bash
There is no problem with this, it does however benefit you to use /usr/bin/env as you get a little more flexibility of control of the commandline as well as the environment passed to it. The -i and -S options in particular are of use to people who wish to isolate a script or provide additional arguments to it. In general, it is just a little more flexible (without any drawbacks) to:
1
#!/usr/bin/env bash
This also works great with scripting languages like ruby, perl, and python.
The ‘x’ trick
Some Bourne Shells are more finicky about syntax than others, and depending on how intrinsics like test are invoked, quoting becomes an issue. Take for example this small script:
1
2
3
4
if [ "$foo" = "" ] then echo"foo is empty" fi
This is a problem in a traditional Bourne Shell because of how the if line is evaluated. More or less, [ as previously mentioned is actually a program. When [ is invoked, the if has already swallowed the quoting, so the syntax is essentially:
1
[ <expanded $foo> = ]
Which is of course a syntax error. This even gets more gory when $foo is also empty. The trick here is to use a placeholder character, typically an x, to pad the value so you can check for the existence of that. If it’s the only thing there, the string is empty, but the syntax error is now gone.
1
2
3
4
if [ "x$foo" = "x" ] then echo"foo is empty" fi
Stream processing with shells
A lot of people deal with file contents only through pipes (e.g., grep) or end up using excessive amounts of ram stuffing files into variables. There are actually easier solutions to this.
The variable $IFS can be set to a delimiter character (the default is “whitespace”) which is then used to delimit data. This variable has impact on for loops, as well as the read command, which is the key to our trick here.
When while and read are combined, great things can happen:
1
2
3
4
(whileread foo do echo$foo done) < my_file.txt
A lot of people do this:
1
2
3
4
for foo in $(cat my_file.txt) do echo$foo done
The issue here is that cat is going to shove the whole file in RAM. The < in the while reads it iteratively, reducing the ram usage to more or less one line at a time.
fin
That’s all I can think of today. Perhaps there will be another one of these in the future!
One thing a good scheduler must do is “binpack”, which is the art of finding the right spot for your special program to run in a group of otherwise able computers. Computers have limited resources, and staying within those limits is key to having a good multi-tenant experience. Binpacking is named as such in relationship to the concept of several bins of pears at a pear farm in a line, collecting pears from the trees. You will fill the bins at different rates, so knowing both when the bins are full and how to divert the resources to available bins is a very important part of scheduling.
Binpacking is fundamentally a set theory problem, which I will demonstrate with basic binary operations. This is a simplification of the problem, but we’ll get into more advanced scenarios in a bit.
First off, the goal is to turn all these 0s into 1s:
1
0100000100001000
Until then, the number really isn’t saturated, now is it? So let’s do a binary “exclusive OR” operation with this other number! This will give us the result we want:
1
1011111011110111
Since “exclusive OR” gives us a 1 if either is true, but not both, we get the result we want without colliding.
1
1111111111111111
And this number cannot be amended now without turning a 1 back into a 0. This is the basis of how a scheduler works within a single node, but also amongst the whole cluster.
Think of each one of those 1s as a taken CPU, and every 0 as a free one. Now, this is a single vector, which we can combine with other vectors such as memory usage or even much more subtle metrics like CPU pressure to determine a suitable host to stuff our container or VM onto.
A good way to express set theory with an arbitrary number of parameters is SQL, since it is more or less designed to handle this problem in all sorts of nefarious ways. Most of this tutorial will be based in the SQL language, so if you want to take it to your favorite general purpose language and use these ideas that way, great! It’s probably gonna handle SQL fine. Also keep in mind that none of these techniques are expressly limited to SQL, they’re just easier to model in a SQL language. A RDBMS generally has other drawbacks that many schedulers, especially big ones made by Google are not willing to tolerate. As with any large undertaking of importance, it’s critical to weigh your advantages and your disadvantages to the given situation.
All SQL is targeted at PostgreSQL idioms, but should be trivial to port to e.g. SQLite or MySQL.
Let’s start with a good schema for our database:
1
2
3
4
5
6
7
8
9
10
11
12
13
14
15
16
17
18
-- list of the nodes. this is our physical (as far as we're concerned at least) -- representation of computing resources. CREATETABLE nodes ( id serial primary key, ip varcharnotnull, total_cpus intnotnull, -- this is usually measured in vCPU which is 0.5 CPUs, usually a single CPU thread total_mem intnotnull, -- probably in gigabytes but depends on the scenario total_disk intnotnull-- disk is usually much more complicated than this );
-- this how you create an enum in postgres CREATE TYPE metric AS ENUM('cpu', 'memory', 'disk');
-- each entry indicates a block of that metric in use createtable nodes_stats ( node_id intnotnull, metric metric notnull );
To reiterate what the comments say, we keep one table, called nodes, which is a representation of our physical limits for each instance we manage. We then store a metric for each unit in use.
To enter a new node, we simply insert it with its fixed stats:
To query nodes that are available for use, we have to get a little more creative. What we do here is count the number of metrics for a given vector that are in use, then we subtract that number from the total available and see if it meets our requirement. This is very similar to what the exclusive OR does above semantically, but just with larger pieces of data.
Please note in this query that target_cpu, target_mem and target_disk are all placeholders and depend on what kind of data you wish to require. It’s also expected that you would do this with a transaction that also inserted the used data, ensuring basic atomicity.
SELECT nodes.id, cpu.metric, mem.metric, disk.metric FROM nodes LEFTOUTERJOIN (SELECT nodes.id AS id, count(metric) as metric FROM nodes_stats INNERJOIN nodes ON nodes.id = node_id WHERE metric ='cpu' GROUPby nodes.id, nodes.total_cpus HAVING(nodes.total_cpus -count(metric) < nodes.total_cpus - target_cpu) ) as cpu ON nodes.id = cpu.id LEFTOUTERJOIN (SELECT nodes.id AS id, count(metric) as metric FROM nodes_stats INNERJOIN nodes ON nodes.id = node_id WHERE metric ='memory' GROUPby nodes.id, nodes.total_mem HAVING(nodes.total_mem -count(metric) < nodes.total_mem - target_mem) ) as mem ON nodes.id = mem.id LEFTOUTERJOIN (SELECT nodes.id AS id, count(metric) as metric FROM nodes_stats INNERJOIN nodes ON nodes.id = node_id WHERE metric ='disk' GROUPby nodes.id, nodes.total_disk HAVING(nodes.total_disk -count(metric) < nodes.total_disk - target_disk) ) as disk ON nodes.id = disk.id WHERE ( cpu.metric ISNOTNULLAND mem.metric ISNOTNULLAND disk.metric ISNOTNULL ) OR ( cpu.metric ISNULLAND mem.metric ISNULLAND disk.metric ISNULL ) LIMIT 1;
This query will select a free node every time, provided you’re inserting your metrics once you find something suitable in an atomic way.
Anyway, there you have it! Hope you enjoyed this, it was fun to put it together.
Hi friends! Today I will be offering an article on how to write your own, specialized DNS server with the rust trust-dns toolkit.
Why write a DNS server?
It’s not necessary in a lot of situations. Mostly, this article will be targeting situations like:
You have a very specialized need for a DNS server, and want the minimum impact possible for an environment.
You have very dynamic/ever-changing needs, and wish to sync your DNS server with the source of truth to avoid a configuration management / de-sync problem.
You want better control over the performance of your DNS solution.
Why trust-dns? Why not BIND or ldns or?
Services like BIND, CoreDNS, ldns, and even kubedns provide configuration-driven solutions to solving your problem. This is not a always a great solution when your configuration can change out-of-band, meaning that the change originated in a source that is not the configuration of the service. For example, a PostgreSQL database, an API you’re querying for more information about your hosts, or even a git repository. Something has to synchronize this configuration to the DNS service, and while continuous delivery pipelines are very nice these days, sometimes the amount of time they take to run is too slow, or simply impossible to do at a rate that matches the rate of change you want.
trust-dns provides its own server, a named-alike that has quite a numerous set of features and I strongly suggest you look at it. It is asynchronous, relying on the tokio toolkit, and multi-core aware as well. My simpler DNS servers based on the libraries yield upwards of 300,000 resolves/sec on a Ryzen 5900X with zero failures; something that none of the above servers get close to boasting.
Aside from all that, trust-dns has thankfully divided its components into numerous parts as independent rust crates, which you can import independently to get different bits of functionality. For example, the trust-dns-server package provides the server components, while trust-dns-resolver implements DNS resolver bits. To make a cache-free forwarder, one imports both, and bolts the resolver into the server. Very elegant and easy to use.
What have you done with trust-dns?
zeronsd, which is a DNS server that stays in sync with your ZeroTier LAN configuration, providing names for your IP addresses of residents on the network. ZeroNSD is used by a lot of ZeroTier users.
polyresolver which is a forwarding plane for multiple DNS servers based on the domain you’re trying to resolve, providing a sort-of “split horizon” DNS at the resolver level.
border, which is an experimental load balancer and DNS service with automated health checking and consensus. This is not ready for production.
nsbench is a DNS flooder / benchmarker that uses the trust-dns-resolver toolkit.
Internal projects at companies that needed a DNS server.
Ok, I’m sold. How do I get started?
This article will start from no repository to a fully-fledged one. We will use a very specific version of trust-dns and a Cargo.toml to reflect that, hopefully ensuring that even though the dependencies may drift later, this code will still work. Upgrading your dependencies (and covering any API mismatch) should be a priority concern if you take the concepts used here into production.
The repository
It wouldn’t be very nice of me if I just made you cut and paste a bunch of crap into a file, so I created this repository for your perusal. If you’d like to avoid the rest of the words and get right into the meat, that’s also up to you! It builds a binary called examplens that takes an examplens.yaml in the current directory for its configuration, which is parsed with serde and serde_yaml. examplens just overwrites DNS entries provided in domain root -> A record format, for example:
1
2
example.com: foo.example.com:127.0.0.2
Will resolve foo.example.com at 127.0.0.2.
Cargo setup
The rest of this tutorial assumes you are starting from scratch. If you’d rather follow along by cloning the repository and opening files, you’re welcome to do that, too!
First off, to create the repository, we use cargo new --bin examplens.
To fill Cargo.toml‘s dependencies, we’re going to be quite prescriptive in our dependency settings, so this project works without me having to maintain this blog article. :) A nice feature of cargo is that it’s really, really good at doing stuff like this.
The dependencies section should look like this:
1
2
3
4
5
6
7
[dependencies]
serde = "^1"
serde_yaml = "^0.9"
anyhow = "^1.0.0"
trust-dns-server = { version = "^0.22.0", features = [ "trust-dns-resolver" ] }
trust-dns-resolver = { version = "^0.22.0", features = [ "tokio-runtime" ] }
tokio = { version = "^1.28.0", features = [ "full" ] }
To cover issues we’ve not discussed yet, We use anyhow as a general error handler. This is much simpler than having to write error types for things we, well, don’t care too much about. anyhow will just make it easy to get the string error out of it, while still providing the error handling functionality we desire.
We also add some features to trust-dns-server, namely integrated support for the resolver. This will pull it in automatically, but we need to pull it in manually to add deliberate tokio support, as we want to stay within the tokio runtime. If we did not do this, the resolver would resort to the synchronous version of the resolver, which would potentially block our resolves while it was out trying to forward queries.
Parsing the configuration
I’m going to gloss over this fairly fast, as I don’t want this article to be a treatise on serde. Functionally, we define a tuple struct called DNSName which encapsulates the trust-dns Name type, which manages DNS names. Then, we write a simple serializer and deserializer for it which calls Name::parse, which is a RFC-compliant DNS name parser. This allows us to embed the names as strings in our YAML, and ensure that by the time they get to trust-dns, they are valid DNS names, as the program will complain and abort long before then if they aren’t. Code follows.
In our main function, we add just enough code to parse our YAML and present it as a std::collections::BTreeMap of data, starting with the domain apex and nesting into domain -> DNS A records (IPv4 addresses). Since validation is handled by serde, all we need to do is specify the types and we can be assured they will be parsed correctly, or the program will fail to run.
let_records: Records = serde_yaml::from_reader(io)?;
Ok(()) }
Generating the records
Next, we’ll want to generate records. There are only two kinds of records we’re going to generate: SOA, or “Start of Authority” records, which define a domain apex, and A, or address records, which associate a name with one or more IPv4 addresses.
trust-dns accomplishes storing these records in a Record type, which has associated data. Then, since many DNS records are actually collections of results, stores each record in a RecordSet collection associated with the name. Finally, this is pushed into an Authority, which is then provided to the Catalog. trust-dns will happily serve your catalog for you without much instruction.
Start of Authority Record
A SOA or “Start of Authority” record lives at the apex of the domain and controls many properties of the domain as a whole, including instructions to other name servers who might resolve through it, and how to behave with regards to caching, hammering the server, and so on.
To create this record, let’s define a small routine that does so. This routine accepts a domain name and sets some reasonable defaults. The SOA type has a lot of properties, and some have very well-defined values. It is important to note at this time that a great deal of trust-dns‘s documentation covers the DNS RFCs as specified, so it’s not a bad idea to read the docs especially for the different types. You might just learn something. :)
Note that we are creating a Record and RecordSet, setting data on the Record, then inserting it into the RecordSet with a static serial number. The TTL is 30 seconds, specified in a few places. In a real world scenario, TTLs and serials should probably be a lot easier to control external to the program.
We do the same with the A record, only we’re going to accept the appropriate type for IPv4 addresses, which is unsurprisingly called Ipv4Addr. We do a similar dance here, where we create the RecordSet, and slam a Record into it. Most of trust-dns works this way.
Now that we have our RecordSets, we can build the Catalog. To build the catalog, we’re going to create two Authority objects, which are of different types. The first will be our records, and the second will be a ForwardAuthority for all other domains which don’t match our records. This allows the DNS server to function as a forwarding plane for any records that aren’t ours, allowing it to be used as a DNS resolver, for example.
For the ForwardAuthority, we need to define some upstream DNS servers. We just use trust-dns‘s excellent tooling to read the system’s resolv.conf and inject those for us. So now, your DNS server is not only throwing your records into the mix, but for anything that doesn’t match, it just goes to your normal DNS provider.
An InMemoryAuthority is used, which is also provided by trust-dns for our convenience, which takes a well-formatted BTreeMap for it’s corpus. Since we’ve already created everything in BTreeMaps, this is an easy conversion. We need to simply convert the keys to RrKeys (RR is short for “resource record” and used in many parts of DNS) and associate them with the RecordSet we built.
Once we’re done building these authorities, we upsert them into the catalog, and present the catalog to the caller of this function.
Remember that main function? Now we need to rewrite it to both generate our catalog, plus provide the services that we want to serve. That involves setting up some tokio stuff, and then binding that to the trust-dns library so that DNS can be served properly.
It’s important to note at this time that DNS operates over both TCP and UDP, where TCP is used for larger records that UDP can’t be used to field, and a few other things. Setting this up properly is key. We’ve decided to give the TCP socket a 60 second timeout to ensure that any call made into it gets a reasonable chance to get back out before being terminated.
So, tacking on to the rest of our main function, we start listeners for TCP and UDP on port 5300, so we don’t have to run it as root, which is required for ports less than 1024 on the majority of operating systems. Don’t worry, we’ll look at how to query it later. Then, we take those listeners and encapsulate them in a trust-dnsServerFuture, which does the job of running the server for us. After that, we call block_until_done() on the ServerFuture which keeps the server running until the program is terminated, or a serious error occurs.
letmut sf = ServerFuture::new(generate_catalog(records)?); sf.register_socket(udp); sf.register_listener(tcp, Duration::new(60, 0)); match sf.block_until_done().await { Ok(_) => Ok(()), Err(e) => Err(anyhow!(e)), } }
Running and Querying
So, I did not include the myriad of use statements you would normally add to your rust program to import all these types. So, for the sake of brevity, if you want to follow along, use the repository.
If you cargo run the project, or cargo install --path . and run examplens, it will expect a configuration file called examplens.yaml in the current working directory. If it does not exist, it will fail to run. You can use this configuration, which we will use in the querying examples:
1 2
example.com: foo.example.com:127.0.0.2
This associates a SOA for example.com, and then associates the IP 127.0.0.2 for foo.example.com. example.com itself is a RFC-specified “dead” domain name, intentionally used for examples in RFC documents. It will not resolve to anything on the global internet. Try now, if you’d like. So, this is a good test that our resolver is working properly.
To query, run the server in the background, and use the dig tool to query it:
1 2 3 4 5 6 7 8 9 10 11 12 13 14 15 16 17 18 19
$ dig -p 5300 foo.example.com @127.0.0.1
; <<>> DiG 9.10.6 <<>> -p 5300 foo.example.com @127.0.0.1 ;; global options: +cmd ;; Got answer: ;; ->>HEADER<<- opcode: QUERY, status: NOERROR, id: 9014 ;; flags: qr aa rd; QUERY: 1, ANSWER: 1, AUTHORITY: 0, ADDITIONAL: 0 ;; WARNING: recursion requested but not available
;; QUESTION SECTION: ;foo.example.com. IN A
;; ANSWER SECTION: foo.example.com. 30 IN A 127.0.0.2
You can see here that we had a successful query, it resolved to 127.0.0.2, and it took 1ms to run, which we’ll learn later is the smallest number dig can produce. :)
Your IP address will likely be different, but you can see the result was a success, and it took 50ms to run.
How fast is it?
These numbers are produced on a M1 Mac, on battery, with the nsbench utility. Note that this is a fairly experimental (and slightly broken) utility, but it does measure resolves properly and reliably.
cargo run --release was used to launch the DNS server, so we get the best code rustc can create. Here’s some of the output. Note this will be much faster (an order of magnitude or better) on server class hardware or even a cloud VM, but the results are still quite pleasing for something we cobbled together in an hour.
Wayland provides a lot of fine enhancements over X11 and xorg, which has tried hard to maintain a protocol older than most of the people that will probably read this. Some of the things it brings:
Composition: While there is a specific meaning for compositing window manager, this is more frequently used as a bucket term for a number of technologies that use the 3-D features of your graphics card to provide enhanced visual effects, such as V-Sync on fast output, transparency, and a few other things.
Simplification & Integration: Wayland puts more control of the operating system in the hands of the window manager, allowing it to function more like a cohesive product, instead of two things that happen to work together: a consequence of the X11 client/server architecture.
Performance: all this adds up to a nice healthy performance boost. Personally, I’ve seen my idle CPU usage drop by about 8% or so on a i7-8790k.
You heard that right: it’s faster, it’s smarter and it’s even prettier. So why isn’t it more used?
It’s a little less mature than most people would accept, but with the adoption of it in several major Linux desktop providers and the ubiquitous GNOME desktop environment, it is gaining rapid maturity. I have caused two crashes while configuring the thing, and experienced one while not expecting something bad as of this writing (about 24h in).
That said, today we’re not using GNOME. We’re using something else, called Sway. Sway is much like i3 down to the point where it will ingest most of i3’s configuration file. As an i3 user, I found this an attractive and low-risk way to test Wayland. After all, I could always just go back to i3 and X; but my configuration is somewhat complicated to build, and a 3 day configuration festival was not in the cards this time… I have shit to do! Sway’s “close-enough” parsing of i3’s configuration was exactly what I needed to make the trial run fast.
What follows is my journey into the vortex of GUI configuration, a black hole for many software developers, leeching the light and breath out of many of you that would rather be doing anything else. I took this bullet for you.
Hardware
Let’s talk about hardware really quick. Graphics cards matter. For now, I strongly recommend getting a low end, current generation AMD Radeon. I have a 5500. If you want to play games, go up, but you want a Radeon for now.
My setup is different than many, and a picture is worth a thousand words, so:
Here lies:
Three 4k monitors in portrait mode, this is 2160 x 3840 in effect, a set of numbers we’ll see more useful as we dive the configuration. Sway does not support this configuration natively, (neither does X or i3, really, fwiw) so shoving it into place is an exercise we’ll touch on later.
One ZSA Moonlander and one Apple Magic Trackpad. These only matter because I had to do next to nothing to get these to work exactly as I’d like them to. Sway and Wayland had the goods configured right, and it does help that the keyboard is firmware-programmable.
The video card as previously mentioned is a Radeon 5500. Other kit doesn’t matter much; it’s fast. The machine has 32GB of RAM, but even with all apps loaded it idles at around 5-6GB without any extra VM work or lots of browser tabs, etc.
Starting Software
If you’re playing the at-home game:
Manjaro GNOME 21.0.3 w/ linux511 5.11 kernel package. 5.11.16-2-MANJARO is currently in use.
Arch probably works here but some of the package names may be different, or come with different default configuration.
i3 is configured and ready to work (but this is not necessary to follow along). GNOME is mostly left untouched.
Installing
The Manjaro/Arch packages we need are:
sway (window manager)
swaylock (desktop locker)
swayidle (idle management, powers of screens, locks computer)
waybar (status bar)
alacritty (terminal)
mako (notification daemon)
Plenty of other dependencies will be pulled in; don’t worry, you’re not getting off that easy.
Configuration
Configuring Sway is much like configuring i3; some of the commands are different, however, especially around the I/O systems (your keyboard and your monitors, for example). Please review the following manual pages for more information on configuration:
man 5 sway: this is most of the configuration language. The sway binary can also be used to execute these statements as standalone commands, as we will see soon.
man 5 swaymsg: this is a tool used to query sway, which you will use to configure your displays later.
man 5 sway-output: a manual page just for the output subcommand.
Those are the ones we will need to complete this post, but there are others such as the ones for swaylock and other associated tools, as well as more for sway itself.
Initial Configuration
Start with the defaults. This will fit the documentation better, most of my tweaks aren’t very useful to anyone but me. Instead of providing a full configuring for you to pick through, we’ll highlight parts of the configuration that were sticky instead.
Display Support
Display support is mainly covered by the output configuration directive, and is used in configuration to set the initial layout, but also, you can use it to manipulate the video on the fly similar to the xrandr tool for X11.
In my case, I need to set up the three monitors so that they are occupying enough space – a problem with sway is that all of the displays seem to require being set at the initial rotation that Wayland set them to; you cannot adjust this directly in the configuration file.
Instead, we allocate enough space for them to rotate themselves, assuming we will do that as a part of our login. What a mess, right? Maybe eventually this can be resolved.
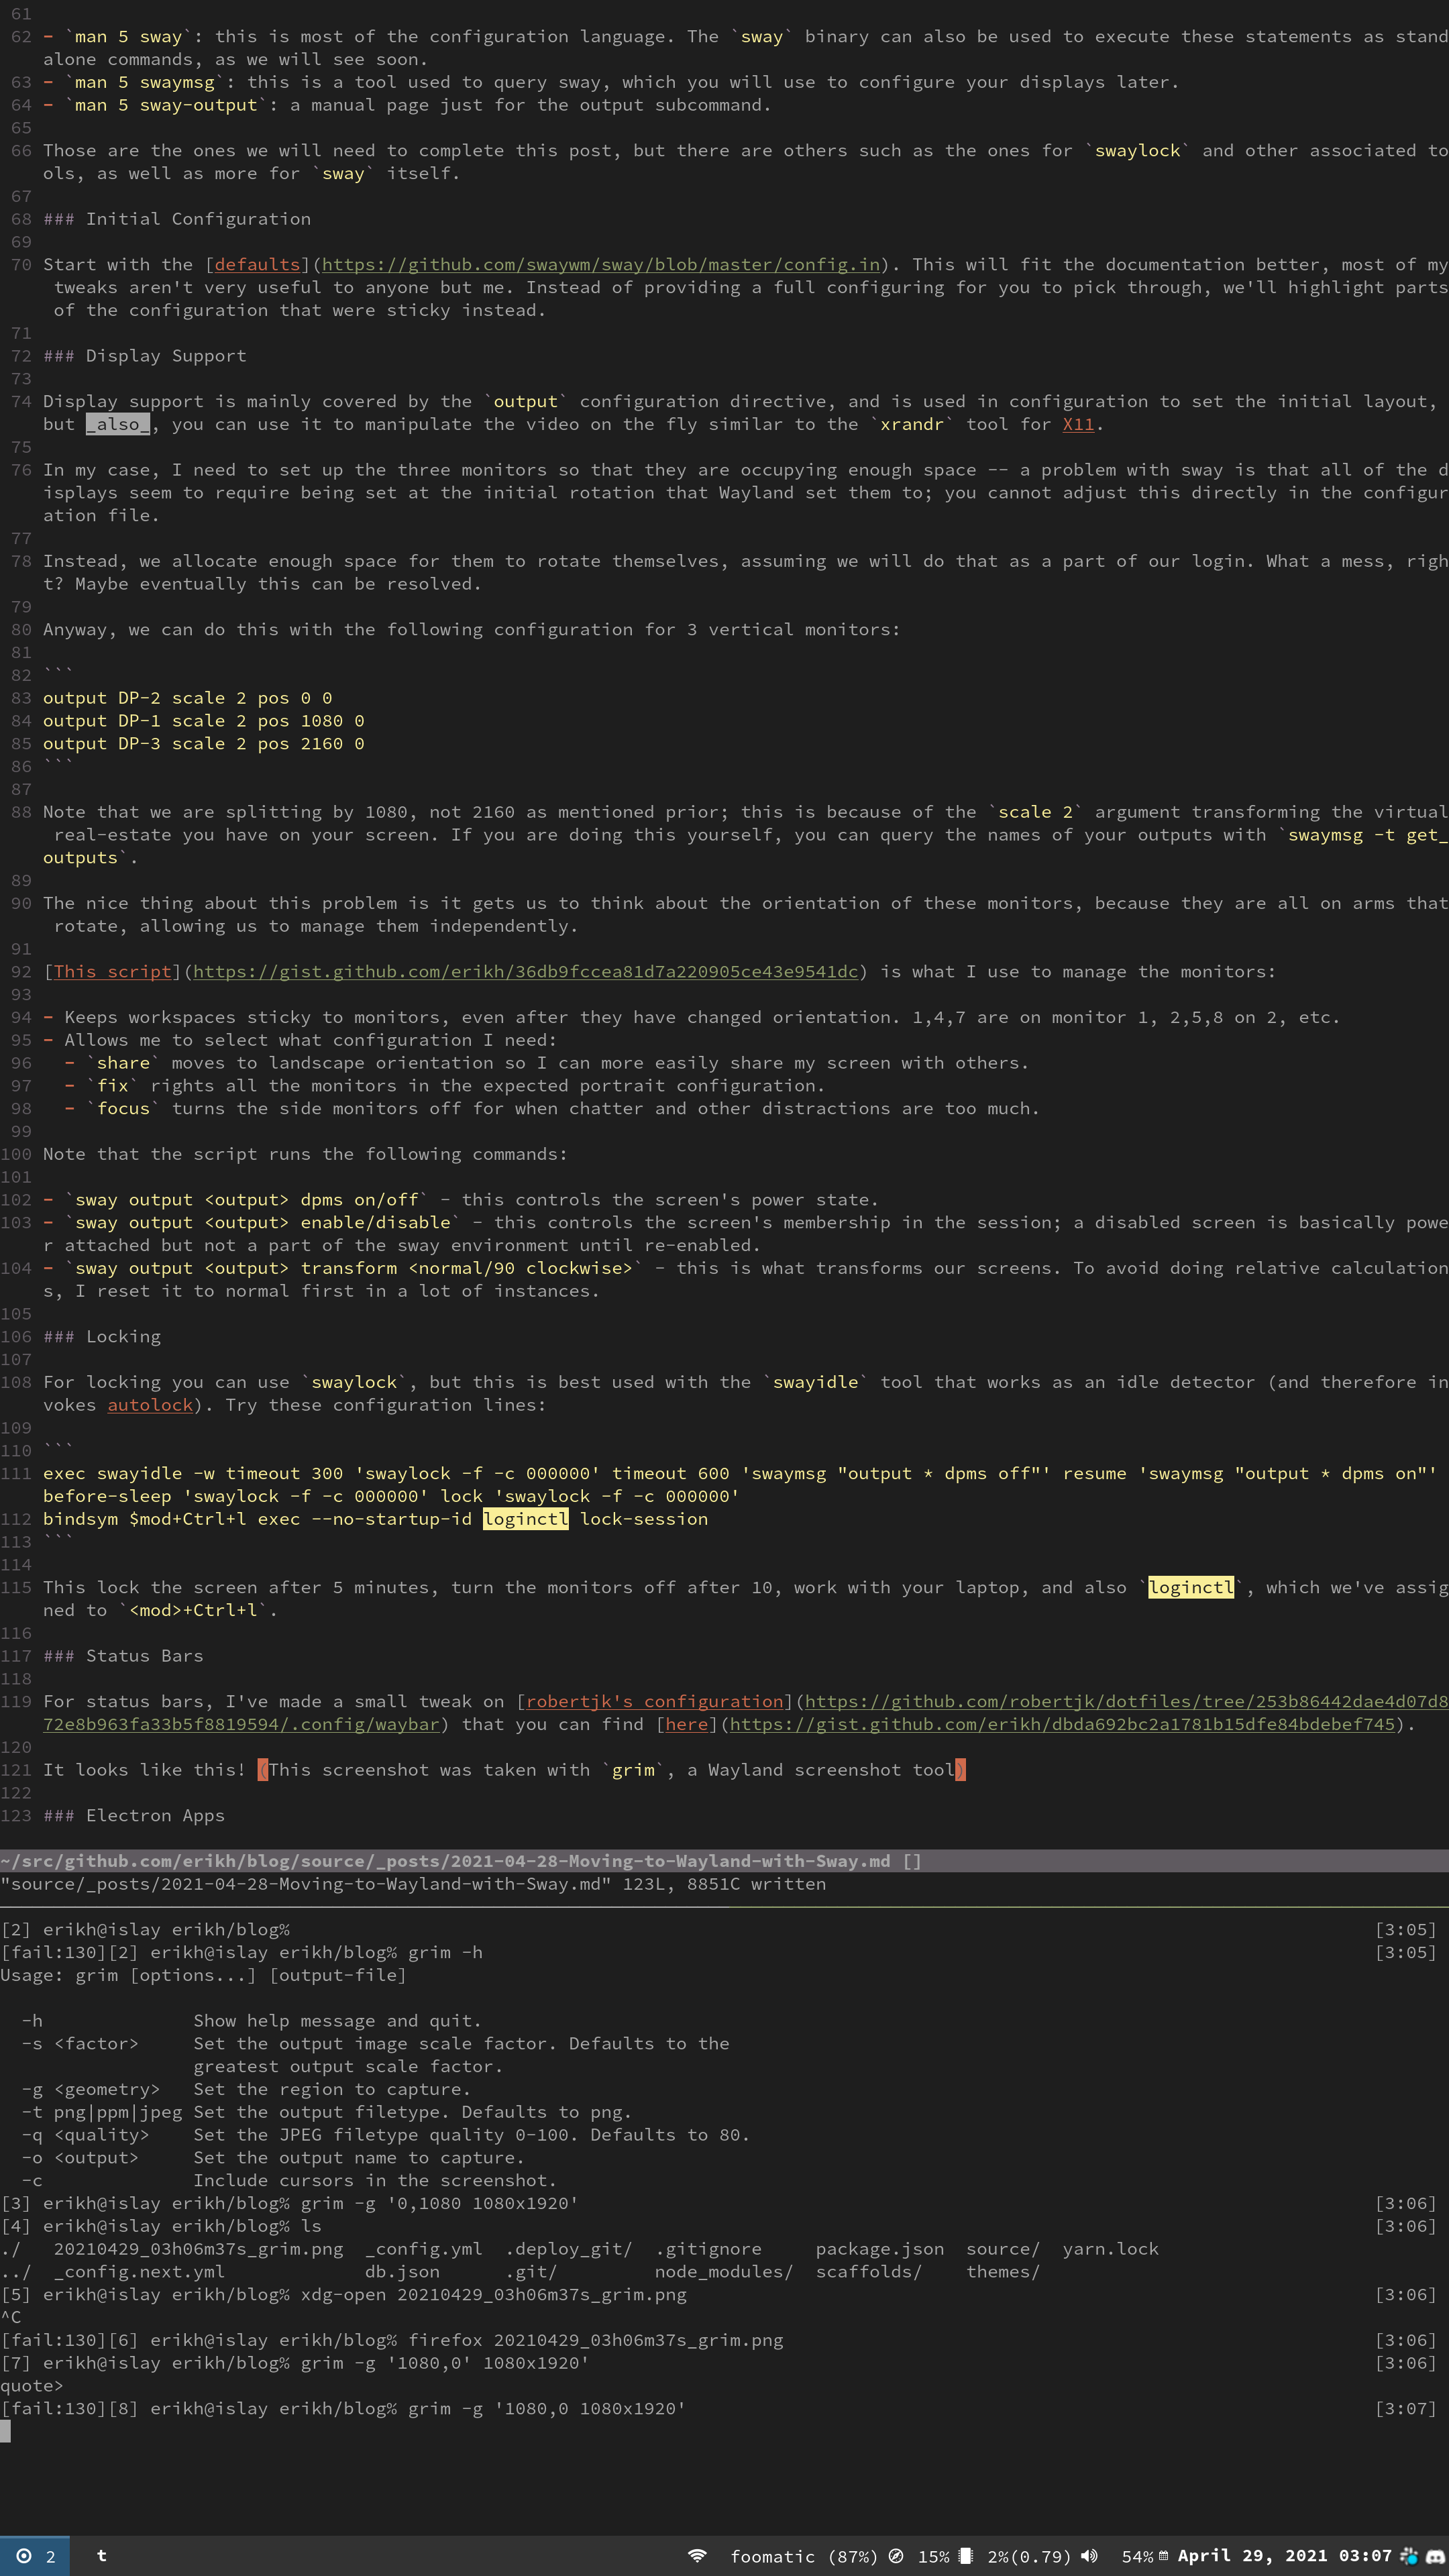
Anyway, we can do this with the following configuration for 3 vertical monitors:
Note that we are splitting by 1080, not 2160 as mentioned prior; this is because of the scale 2 argument transforming the virtual real-estate you have on your screen. If you are doing this yourself, you can query the names of your outputs with swaymsg -t get_outputs.
The nice thing about this problem is it gets us to think about the orientation of these monitors, because they are all on arms that rotate, allowing us to manage them independently.
Keeps workspaces sticky to monitors, even after they have changed orientation. 1,4,7 are on monitor 1, 2,5,8 on 2, etc.
Allows me to select what configuration I need:
share moves to landscape orientation so I can more easily share my screen with others.
fix rights all the monitors in the expected portrait configuration.
focus turns the side monitors off for when chatter and other distractions are too much.
Note that the script runs the following commands:
sway output <output> dpms on/off - this controls the screen’s power state.
sway output <output> enable/disable - this controls the screen’s membership in the session; a disabled screen is basically power attached but not a part of the sway environment until re-enabled.
sway output <output> transform <normal/90 clockwise> - this is what transforms our screens. To avoid doing relative calculations, I reset it to normal first in a lot of instances.
Locking
For locking you can use swaylock, but this is best used with the swayidle tool that works as an idle detector (and therefore invokes autolock). Try these configuration lines:
Terraform has a great ecosystem of providers, which work in many ways analogous to Chef, Puppet, or Kubernetes’ resource ecosystems. The providers allow you to interact with third party tooling that is less desired in the core of the product and preferred to be maintained outside of it.
To interoperate with the terraform plugin ecosystem, this article can help you understand what is involved, but just goes into a specific technique you can use to integrate your APIs with providers. Here is where you can befriend even more wonderful documentation by the Hashicorp folks that can get you on your way to making your own provider. Go there first!
Terraform/Hashicorp keeps a registry of major third party integrations, so be sure to check that out before diving off into third party purgatory. :)
An Introduction to Terraform’s Providers
Terraform talks to it’s providers through an application protocol called GRPC which then leverages a serialized format called protocol buffers to turn your messages into really tiny ones for the purposes of sending over the network, typically at least. Terraform however, uses GRPC to talk inter-process on a single system instead of across the network. Since protobuf (as it is frequently called) is also strongly typed as a serialization format, terraform can map a lot of your Golang types directly to protobuf ones. This is what the terraform schema accomplishes for you; we’ll see some of those definitions in a minute.
But fundamentally, your process is independent of terraform and is for all intents and purposes a really limited webserver that runs for a short period of time. It’s important to know this for the purposes of debugging it later.
What a (small) provider looks like
Each terraform provider consists of a few scaffolding files and the following types:
Provider: There is typically only one of these for a given binary. It defines the provider information as well as its outer schema.
Resource: This has a lot of overlap with a Schema, but ultimately provides the top-tier resources and data sources via callbacks that you write that fill in the rest of the schema. However, resources are also used to populate schema elements in some dynamic and complex scenarios.
Schema: Schemas are basically type definitions, and are frequently represented as a map[string]*Schema to associate the types with their key names.
Using the provider
If you’d like to review the complete code as a repository, try erikh/terraurl on GitHub. If you’d like to follow along with the examples, try a make install after cloning the repo. You’ll need terraform 0.14 to work with this plugin.
Here’s a small provider you can make: one that fetches a URL with a customizable User-Agent and stuffs the result at the target_path, and doesn’t fetch again as long as the modified time and file size are the same. Here’s an example:
First, import our custom provider at the source and version and also operating system and architecture. Because Golang builds to native binaries, we cannot rely on an interpreter to keep us from having to build a version for every select architecture. I strongly recommend looking at investing into go tooling like GoReleaser to solve this problem for you. You may have noticed that make install in the repository does this for you by detecting your architecture with go env.
Boot the provider with the supplied parameters; in this case, user_agent will be changed to something sillier and more amphibian for all client requests.
Finally, it fetches the latest (at the time of this writing) stable version of Golang, and stuffs it under /tmp. State changes are expected to alter the local content, that is, a changed file on disk, or remotely, should synchronize the remote to local.
A deeper dive into the provider
I’m going to do this section a little differently since there is more code than normal. Follow along on Github. See main.go for the majority of the effort.
Types
First, let’s examine the typed/typeless hybrid nature of terraform. You will see a ton of code that works like this:
Most Go programmers know what a type assertion is, the act of making sure an interface{} type is a specific type, used as a type-safe cast, with the penalty being a panicked goroutine for mistakes. When reading the code, keep in mind that almost all type assertions are controlled operations and that the chances of them panicking are low to nil at worst. The schema enforces our types as a part of the I/O process, so we can safely assert them during Get() calls. Note that there is also GetOk() to see if things are modified or exist already, in the event you need to more delicately control this behavior.
In other instances, there is an agreed on protocol – for example the handle to *TerraURLClient, that can be safely asserted into a new variable because it’s configured that way as a part of a standard process. More of these standard processes will be tacked onto the terraform schema later on in this article.
Types will be a thing you battle. We implement some patterns later on in this article to assist with this.
Changed Attributes
You will see calls to d.HasChanged in the provider as well; these are terraform hooks into the metadata system to see if the plan or computed (read) values have deviated from the state; this call allows us to determine if there are any changes to initiate as a result.
This call is used in UpdateContext hooks regularly.
SetId and the ID attribute
SetId("") removes the state for the ID you’re processing. It is frequently used in DeleteContext calls and situations (like our local file deletion) that require state to be re-created.
Note, likewise, you must set an ID to record state at all for the resource you’re processing.
Problems with the current tooling that need solving
So we used a lot of words getting to this point, so this part should be a little shorter and sweeter, now that you know how to make a terraform plugin.
Here are some challenges you will run into.
Many packages are in alpha/beta state
Sorry to call this out at all, but critical things like the package that generates documentation and the schema libraries itself are in beta and alpha states at present. If you want to avoid this by using older tools, you can, but you’re in for a world of pain only the Coen Brothers could describe.
This will fade with time, but you should be aware of it.
Easy propagation of I/O
I/O, specifically around types of all kinds, is kind of a mess of schlepping from one struct to d.Set() calls and back again through d.Get(), probably 95% of the time. It would be nicer if this was easier to do, like flag.StringVar() can work with pointers, I would like to see bound variables for terraform schemas so I can just quite literally point a whole struct at it one member at a time. I think in general this would make terraform plugins much much much simpler to write for the easy cases.
Better support for type conversions
Type conversion beyond the basic types is non-existent, and hard to achieve with just the schema, leading to more boilerplate code. A simple “this is the i/o of the type” set of hooks would help here, I think.
Better support for state auditing (testing)
There might be better tools for this, but what I amounted to was:
And about 8 type assertion functions with short names. I don’t like it at all and have made some strides on the automated testing front, but hope to make a dent in this problem soon too. What I would prefer is to find a solution that already works, naturally. :) It really feels like this is missing and/or poorly documented tooling in Terraform’s arsenal. State auditing after something has changed in terraform seems just incredibly hard to do, and I wish I knew why.
Common Types
I think some canned types would help solve a lot of basic issues with type conversion, too.
Examples of types I’d like to see directly represented in the schema:
Files, Dirs, and Paths
Networks (IP, CIDR, etc)
Solutions
Below are some solutions to the above gripes. I am really enjoying my terraform journey and should be clear about that; all things equal, Hashicorp has really done a bang-up job making a solid API that works as it’s intended to, with minimum opportunity for accidentally being stupid about it.
Terraform testing library
When tasked to write a terraform plugin, I was concerned with how to test it. I didn’t find much that addressed the following question:
When I run terraform, how do I determine what happened?
So I wrote something, you can find it here at erikh/tftest. tftest is ultra-alpha and I recommend you stare at it twice before trying to use it. That said, what it accomplishes are:
Managing terraform runs in an automated fashion
init, apply, refresh, and destroy are covered
Automated examination of tfstate, easy to get from a single call (as a map[string]interface{})
Signal handling is covered, with automated cleanup/destroy on all failures/cancellations
Integrating with golang’s testing library is also covered; it will automatically schedule a Destroy after you apply in the *testing.T.Cleanup() system.
It is a spiritual companion to erikh/duct, if you need something like that for docker.
A Schema Wrapper package
The schema wrapper (SchemaWrap and ValidatedSchema) is printed below. Summarily, it manages the conversion of types, the validation of types before they ever reach terraform or the API hit, and generally treats terraform as a write-through cache, keeping all operations a few lines of code away from synchronization in your logic at all times. The goal of the schema wrapper is to remove as much boilerplate as possible when dealing with properties of a resource.
// ValidatedSchema is an internal schema for validating and managing lots of // schema parameters. It is intended to be a more-or-less write-through cache // of terraform information with validation and conversion along the way. type ValidatedSchema struct { // Schema is our schema. The key is the name. See SchemaWrap for more information. Schema map[string]*SchemaWrap // Should be programmed to yield the type at Yield time. YieldFunc func(ValidatedSchema)interface{} // Should be programmed to populate the validated schema with Set calls. CollectFunc func(ValidatedSchema, *schema.ResourceData, interface{}) diag.Diagnostics }
// SchemaWrap wraps the terraform schema with validators and converters. type SchemaWrap struct { // Schema is the terraform schema. Schema *schema.Schema // ValidatorFunc is a function, that if supplied, validates the data and // yields an error if the function returns one. ValidatorFunc func(interface{}) diag.Diagnostics // FromTerraformFunc converts data from terraform plans to the Value (see // below). It returns an error if it had trouble. FromTerraformFunc func(interface{}) (interface{}, diag.Diagnostics) // ToTerraformFunc converts data from the Value to the terraform // representation. This must *always* succeed (in practice, this has not been // an issue at this time) ToTerraformFunc func(interface{})interface{} // EqualFunc is used in comparisons, which are used in determining if changes // need to be pushed to our API. EqualFunc func(interface{}, interface{})bool // Value is the internal value; this is a representation suitable for using // in both ValidatedSchema.YieldFunc() and ValidatedSchema.CollectFunc // interchangeably, as in, they can be type asserted without panicking. Value interface{} }
for key, sw := range vs.Schema { vs2.Schema[key] = sw.Clone() }
return vs2 }
// TerraformSchema returns the unadulterated schema for use by terraform. func(vs ValidatedSchema) TerraformSchema() map[string]*schema.Schema { res := map[string]*schema.Schema{}
for k, v := range vs.Schema { res[k] = v.Schema }
return res }
// CollectFromTerraform collects all the properties listed in the validated schema, converts // & validates them, and makes this object available for further use. Failure // to call this method before others on the same transaction may result in // undefined behavior. func(vs ValidatedSchema) CollectFromTerraform(d *schema.ResourceData) diag.Diagnostics { for key, sw := range vs.Schema { var ( res interface{} err diag.Diagnostics )
if sw.FromTerraformFunc != nil { if res, err = sw.FromTerraformFunc(d.Get(key)); err != nil { return err } } else { res = d.Get(key) }
if sw.ValidatorFunc != nil { if err := sw.ValidatorFunc(res); err != nil { return err } }
sw.Value = res }
returnnil }
// CollectFromObject is a pre-programmed call on the struct which accepts the // known object and sets all the values appropriately. func(vs ValidatedSchema) CollectFromObject(d *schema.ResourceData, i interface{}) diag.Diagnostics { return vs.CollectFunc(vs, d, i) }
// Get retrieves the set value inside the schema. func(vs ValidatedSchema) Get(key string) interface{} { return vs.Schema[key].Value }
// Set a value in terraform. This goes through our validation & conversion // first. func(vs ValidatedSchema) Set(d *schema.ResourceData, key string, value interface{}) diag.Diagnostics { sw := vs.Schema[key] if sw == nil { return diag.FromErr(errors.New("invalid key, plugin error")) }
if sw.ValidatorFunc != nil { if err := sw.ValidatorFunc(value); err != nil { return err } }
if sw.ToTerraformFunc != nil { value = sw.ToTerraformFunc(value) if err := d.Set(key, value); err != nil { return diag.FromErr(err) } } else { if err := d.Set(key, value); err != nil { return diag.FromErr(err) } }
sw.Value = value
returnnil }
// Yield yields the type on request. func(vs ValidatedSchema) Yield() interface{} { return vs.YieldFunc(vs) }
Usage
The ZeroTier Terraform Provider makes use of this code as well as implementing several resources atop it. Let’s take a look at the zerotier_network resource which makes heavy usage of the pattern.
An example of its use, taken from the README:
1 2 3 4 5 6 7 8 9 10 11
resource "zerotier_network" "occams_router" { name = "occams_router" description = "The prefix with largest number of bits is usually correct" assignment_pool { cidr = "10.1.0.0/24" } route { target = "10.1.0.0/24" } flow_rules = "accept;" }
We can see that several properties are set; some of these are scalars, and some complex types. Let’s take a brief look at how they’re implemented:
Quickly we should notice that we are constructing global singletons and cloning them. Each time the struct is referred to in the resource code, it is cloned with the Clone() method to avoid corruption. This is not the best part of this design, and if you don’t like it, replacing with a constructor + static return is easy, at a minor if at all noticeable cost to perf in almost all situations.
Let’s take a look at our resource definition for the zerotier_network resource. This function is called during provider definition, and yields the schema to it. The notable thing here is the reference to TerraformSchema(), which is a convenience method to return the pre-defined schema.
1 2 3 4 5 6 7 8 9 10
funcresourceNetwork() *schema.Resource { return &schema.Resource{ Description: "Network provider for ZeroTier, allows you to create ZeroTier networks.", CreateContext: resourceNetworkCreate, ReadContext: resourceNetworkRead, UpdateContext: resourceNetworkRead, // schemawrap makes these equivalent DeleteContext: resourceNetworkDelete, Schema: ZTNetwork.TerraformSchema(), } }
If we look in the create function, we can see the integration of SchemaWrap through the ZTNetwork definition:
Copies everything from terraform into the schemawrap ingester
Returns a ztcentral.Network via the yield function in schemawrap (we’ll discuss this in a minute)
Manipulates the remote resource with the Network struct to the ZeroTier API
After that, the Read function takes over:
1 2 3 4 5 6 7 8 9 10 11 12 13 14 15 16 17
funcresourceNetworkRead(ctx context.Context, d *schema.ResourceData, m interface{}) diag.Diagnostics { c := m.(*ztcentral.Client) var diags diag.Diagnostics
This calls another important method called CollectFromObject, which is the inverse of CollectFromTerraform, but with a synchronization heuristic; it will apply everything to terraform, and let terraform sort out what changed, allowing it to do what it’s good at!
Yielding and Collecting
Subsequently, if we go to ztnetwork.go, we can see that there are several methods in it, and a type definition previously mentioned called ZTNetwork at the bottom. While also containing value checking and type conversion, there are two very critical methods near the top called ztNetworkYield and ztNetworkCollect. You may also see them referred to in the ZTNetwork struct.
Basically, the rules are as thus:
You always yield the native type, or the non-terraform type you wish to incorporate to “define” your resource and distinguish it from others. Yielding must always succeed; if you are panicking while yielding, something is probably not defaulted correctly.
You collect from two data sources: the native type and terraform. The two “Collect” calls above define the two directions collections can go in; both have an intrinsic write-through cache: the native type. The collect hook in ztnetwork.go does the rest of it. Note that unlike Yield, collections can error out. This is because validations and conversions happen at this time.
This implementation could probably be golfed around populating diags a bit, but otherwise feels very simple and compact to me. The ValidatedSchema implementation manages the write-through properties.
Validations and Conversions
I think most people reading this article know what these are, so I won’t spend too much time on it, but fundamentally we slightly extend the schema with Validations that happen earlier than Terraform’s do, as well as conversions that always result in the native type being stored; this way we can always yield without fear of the assertions ever panicking. It also means we can spend less time worrying about how to store complicated data, because the API is already doing that job for us. The conversions are in converters.go, if you want to see how they work.
Impressions
The Terraform ecosystem is arguably still young, but the tooling is solid in lieu of some rougher edges around release cadence.
I would like to see a better solution to types, but Golang is only so capable for this case and honestly, this isn’t too bad, just exceptionally wordy.
I would really like to see more tooling come out of Hashicorp that can do 95% of ingesting an API directly into terraform. There’s a great opportunity for someone to do something exciting between terraform and openapi, I think; which would open zillions of doors for terraform users. A lot of the back/forth between terraform and API calls doesn’t seem as necessary as it might be. I think this is more a reflection on the maturity of the libraries (which again, is really pretty great) than any myopia on the part of the creators. Or Maybe, I’m just terrible at Google. Also possible.
Anyway, thank you for reading. I hope you found this helpful!
Compiler-driven development is a simple pattern that generally makes developers much faster and more efficient. I have been working this way for some time, and wanted to share my experiences; ones I hope are useful to you.
Most of this article covers usage in Golang and vim. You should not need to be a user of vim – just comfortable in your editor – to make use of these tips.
What is compiler-driven development?
Compiler-driven development is just a fancy term for letting the compiler, linter, tests, or other automated code management tools tell you where to go next. Basically, it’s a useful pattern in a variety of scenarios for distilling problems with your code into small, compose-able fixes by letting the compiler tell you in steps what is broken.
Naturally, this doesn’t work for everything (you still have to use your brain sometimes, after all) but it can be quite efficient when you have a nice workflow configured. Additionally, this only works well for languages that have compilers, ideally type-inferred or at least statically typed ones.
Today we will be using Golang and most of the tools will be centered around it. However, many of the techniques you will find applicable to other languages; “Compiler-driven development” as a term is something I picked up from the Rust Book. I love that there is finally a phrase for it (well, at least, a new one to me).
Anyway, on to the meat.
Find your editor’s “save hook” functionality, or use file notification tools
Continuously running your compiler, linter, or other tools is how you get ahead; this is typically easiest to set up as a save hook. In vim for Golang, this is as easy as importing vim-go, which will do much of this for you automatically. vim-go will also format and lint your code, as well as compile check it by default. The results will be in your quicklist for easy search and manipulation.
If you don’t (or can’t; sometimes projects are large and rebuilding large chunks of them isn’t realistic on save) want to invade your editor, consider reflex or similar file-watching tools to scan your tree and run your commands. Grouping your commands into a script or make task will make it easier to run them, as well as include them in your CI to ensure others are running them, too.
The pattern
So, get ready to have your mind blown:
Hack on errors present in the output.
Save.
Wait.
Read the output.
Repeat.
If this sounds familiar, well, that’s because most of us do this basically already. The real win is in the tooling here, and adapting our workflow to depend on the tools and their output to drive us forward.
Things you might want to do on save
Here are a few tools and things you might want to try doing to your code on save to yield a better experience.
Vim-specific things
syntastic is a nice little addition that puts anchors on the left column of any line that errors out. It can also highlight specific portions of the syntax in some cases. Both linters and compilers can be used, it is quite general. It is quite easy to configure: this will enable several linters, for example.
coc.vim is an adaptation of much of the vscode functionality in javascript, providing a TON of language support for things like compiler-driven development as well as dynamic tab completion and other features, in a multitude of languages. Note: CoC should be used with a language server protocol plugin like gopls. Note that vim-go and CoC will both install these tools on demand.
To install Golang support for CoC, type :CocInstall coc-go in editing mode. CoC has a lot of support for different languages and other tools on npm; please take a look around at its repository!
To install tools to support vim-go (including gopls), type :GoUpdateBinaries
Personally, I’ve found including them both beneficial, but can be buggy. Be sure you have gopls configured so that each plugin does not run its own version of it. If I were to use only one of these, it would be CoC.
Golang-specific things
staticcheck (inside this repo) is a great tool for finding all sorts of stuff. It finds everything from common bugs to deprecated APIs. It deserves a special mention because most of the reports you get from using the tool below this one will be from this one specifically; it does cover that much.
Golangci-lint is a multi-linter that runs staticcheck as well as a lot of others, and can accept configuration that can live on a per-repository basis, making it great for editor integration (in some cases).
Also, Golang has a nice build and test cache. Combining this behavior with save hooks or tools like reflex really shines great for focusing on what you’re actually dealing with.
General things
Always try to leverage your language/compiler’s build cache, if available. This will greatly improve response time of your save/notify tools. If your language has something similar to Golang’s test cache, great! Use it.
In that same vein, isolating tests (e.g., with go test -run) can also be a win when working on a project, but be careful to not over-isolate, as then you will get a nasty surprise when it’s time to run the full suite; or worse, in CI!
Identifying your (and your team’s) working habits and distilling them into new tasks to run will be essential to fitting this into your workflow. In an event where you cannot introduce general workflow tasks, consider building your own tools outside of the repository to introduce when you get stuff done twice as fast as everyone else. :D
As computer professionals, queueing is something that’s close to most of us. After all, from the bottom up – from CPU instructions to network packets to async reactor calls – things get in line.
There are lots of queueing approaches in computer science and in life in general; as a result, we’re only going to talk about a specific subclass of queues: durable ones that specifically are not distributed amongst multiple hosts. These tend to be great models for smaller systems that do not need the overhead, complexity or reliability problems that distributed queues have.
Some options before you dive in
So, this is an exploratory mission; while many of these patterns are in use in production scenarios, you may be looking for something more like the following software if you need to solve this problem:
However, if you specifically need to solve the problem covered in this article, you will find there are no good solutions out there that easily resolve your issue. I could release boltqueue (below) as a library but I feel it’s more useful as a pattern than an actual thing you code against.
Explain Queues to Me Like I’m Five
Ok, you didn’t ask for this but that’s what the table of contents (lower left opens the sidebar) is for. :)
A queue is a line; at the end of the line things are inserted, and at the beginning of the line things are removed. These are called the “tail” and “head” respectively. Inserting is called a “enqueue”, and removing is called a “dequeue”.
The most basic thread-safe queue
In golang, a basic queue can be modeled as an array with a mutex (a lock that only allows one thing to run at a time), like so:
type queue struct { items []item mutex sync.Mutex }
type item interface{} // replace with your own type
func(q *queue) enqueue(i item) { // lock our mutex before performing any operations; unlock after the return // with defer q.mutex.Lock() defer q.mutex.Unlock()
// return an error if the queue is empty, to disambiguate it from nils iflen(q.items) == 0 { returnnil, errQueueEmpty }
// take the first item and dequeue the array or overwrite it if there's only // one item i := q.items[0] iflen(q.items) > 1 { q.items = q.items[1:] } else { q.items = []item{} }
// start a goroutine to evacuate the queue while filling it concurrently gofunc() { deferclose(done)
var i interface{}
for ok := true; ok; _, ok = i.(int) { var err error i, err = q.dequeue() if err != nil { return }
fmt.Println(i) } }()
for i := 0; i < 10000; i++ { q.enqueue(i) }
<-done }
Channels
An even easier solution in Golang specifically is channels. Channels are the language construction of a queue which can be shared without copying its data.
// start a goroutine to evacuate the queue while filling it concurrently gofunc() { deferclose(done) for i := range intChan { fmt.Println(i) } }()
for i := 0; i < 10000; i++ { intChan <- i }
close(intChan) <-done }
Simpler, and much faster given the runtime’s direct involvement.
So, wait, you said something about durable?
Yes, I did! You may have noticed that your queue always starts at 0 and counts up to 9999. Durable queueing enables us to start at 10000 and work upwards as we encounter new data, between process restarts. Naturally, this involves databases of some form.
The filesystem is a database, right?
Yes, it is, but not without its shortcomings in this regard. Here’s an approach that appears to work, but probably won’t if the disk fills or becomes unavailable. POSIX filesystem architecture was not very well-suited to fulfill this need. That said, many local mail clients interact with filesystem queues via the “Maildir” format, which is essentially a queue.
for _, fi := range fis { files = append(files, path.Base(fi.Name())) }
q := &queue{dir: dir}
fnints := fnInts{}
// sort the files; then use the filenames to calculate first/last positions for _, file := range files { fint, err := strconv.ParseUint(file, 10, 64) if err != nil { returnnil, err }
q, err := newQueue(dir) if err != nil { panic(err) }
i := q.last + 1
gofunc() { for { b, err := q.dequeue() if err != nil { time.Sleep(10 * time.Millisecond) continue }
fmt.Println(string(b)) } }()
for { time.Sleep(10 * time.Millisecond) // throttle it to avoid filling disk too fast if err := q.enqueue([]byte(fmt.Sprintf("%d", i))); err != nil { panic(err) }
i++ } }
So, when you start this queue, stop it, and start it again, it will resume where it left off. Try it! Run it like so:
1
go run main.go /tmp/foo
And press Control+C to exit it. ls /tmp/foo. Notice how it’s full of files? Those are your queue elements; each one will contain its value as the content. Working as intended!
If you want to see it repeat itself from it’s last state:
1
go run main.go /tmp/foo | head -10
Run that a few times. It will yield the first ten items of the queue.
When you’re done, just rm -r the directory.
So you said this wasn’t kosher. What gives?
On POSIX-compliant systems (pretty much everyone), there’s a thing called EINTR, it’s a constant that’s short for “Interrupted System Call”. While Golang handles this very elegantly in spots, what it means is that your transactions (the writes to the filesystem) can be interrupted, so they have to be retried. This most commonly occurs when a signal is fired; like the “interrupt” (SIGINT) signal you sent when you last pressed Control+C, as well as the head -1 signalling the exit by way of SIGPIPE, another signal used to determine to a process writing to a pipe that its reader has died.
Again, Golang will handle this well and terminate early or persist the write regardless, but we’re still losing data. If you’re watching carefully, that number jumps a few points when you do either thing from time to time – that’s de-sync from the queue’s internal state and the filesystem.
You can read more about EINTR here. man 7 signal for documentation on signals.
The solution here is not especially complicated but also deceptively delicate: a signal handler, plus some more detailed file management around reading and writing would be in order to correct some of these edge cases. DB safety outside of the program is a non-starter.
The problem here is not necessarily the performance or overhead of the solution; but the effort required to maintain it and verify it.
So what’s next? More databases?
Yes, let’s try a SQLite database next. SQLite is nice because we can both model it entirely in memory or on disk, allowing for some more interesting deployment strategies in complicated scenarios. It’s also made to run alongside our program, ensuring that signal handling is simple (just close the db).
SQL is its own beast though, and comes with its own, unique woes.
Let’s look at what that approach might look like. Here is a basic queue that just fills a database and retrieves it in lockstep; we can lock the transaction for now with a mutex (more on this later, though) and just gate it that way, using the database as backing storage leveraging very few of SQL’s concurrency management tools.
We’ll be using mattn/go-sqlite3 to manage our database, although you may want to consider using a higher level component such as GORM for a larger application.
// not checking the error so we can run it multiple times db.Exec(` create table queue ( idx integer primary key autoincrement, value unsigned integer not null ) `)
q, err := newQueue(os.Args[1]) if err != nil { panic(err) }
gofunc() { for { x, err := q.dequeue() if err != nil { continue }
fmt.Println(fmt.Sprintf("%d", x)) } }()
i := uint64(0)
for { if err := q.enqueue(i); err != nil { panic(err) }
i++ } }
You can run this with the following:
1
go run main.go foo.db
Run it multiple times to see the restart. It should never be off.
So, what’s wrong with it?
So, there are a number of issues with this approach. Nothing is inherenly wrong with this approach, though, unlike the filesystem example. You can use this, if all you want to queue are unsigned integers.
SQL is a lot of overhead
SQL has to be parsed, the syntax is optimized and then in almost every database, there is a second layer of optimization that works against indexes and other structures within the database itself just to make a query. While definitely having its place it’s a lot of overhead for us.
SQL transactions have weird semantics
They’re also sluggish and tend to vary between database platforms.
AKA, this is why we’re using a mutex. I have never personally found SQL’s transactional systems to be anything but “clear as mud”, especially when working with more stringent levels of isolation. In this case, a simple mutex mitigates the kind of contention in the database that transactions typically fail at, miserably.
Which brings me to my last point…
It’s slow
It’s just slow. It does the job and if you were on a phone or something and were limited on tooling, sure. Maybe. But there are better options for this problem.
A wild BoltDB appears
BoltDB is a key/value storage engine for golang that is in the spirit of LMDB, another popular key/value store developed in C.
We’ll be using the bbolt variant, for our purposes, since it seems to be better maintained.
q, err := newQueue(os.Args[1]) if err != nil { panic(err) }
gofunc() { for { idx, x, err := q.pop() if err != nil { continue }
fmt.Println(fmt.Sprintf("%d: %d", idx, x)) } }()
i := uint64(0)
for { if err := q.enqueue(i); err != nil { panic(err) }
i++ } }
You run this one just like the last one:
1
go run main.go bar.db # not the same db! ;)
And you can restart it, pipe it to head and so on. It outputs two numbers this time, one corresponding to the index, and another that indicates from 0 the items entered during that process run; this number will reset as you restart the process, but depending on how fast you drain you will not see the repeats immediately. The index will not repeat.
Because the signal handler interrupts the fmt.Println, most of the time we do not see the last value cleared; so there will be a 1 unit gap.
How does it work?
The NextSequence() calls yield an integer which is then packed into a 8-byte array, which is how large a uint64 is. It is this stored along with your own value in similar fashion, also a uint64. For return, it simply pulls the first item the cursor yields and deletes it.
BoltDB’s cursors are nice in the fact that they always return the keys in sorted byte order, so this works without ever consulting the tail at all, or worrying about sorting. The db is happily persisted and all is good in the world; if you’re feeling paranoid, a signal handler will finish the job here.
Advantages
There are a lot of advantages to this pattern and it’s one I think I’m fairly comfortable using and talking about, so here are a lot of advantages over the others:
Locking is a solved problem
The Update() calls automatically enter a transaction when the inner function is called; if an error is returned, the transaction is automatically rolled back. You may notice I opted for a similar pattern with the SQL code, just doing it by hand. The Update() call here is done under database lock so no writers can interact with the database at all until the transaction completes. This is functionally a mutex for us.
It’s fast
Try it! Compare it to the SQL version. The bbolt version does much much less despite being a similar amount of code. It also creates smaller data structures that need less work to iterate. This is a better solution on performance overall.
It’s pretty damn easy
The code above is not that complicated, contains no real “gotchas”, and isn’t that hard to read (at least, I don’t think). The bbolt solution wins on the maintainability front, as well. If you need multiple queues in a single database, use multiple buckets. You can even relate non-queue k/v data to the queue in a separate bucket and handle that all under View() or Update() calls safely. You just need to understand how bbolt manages its keys and the relationship between keys and cursors.
Thanks for Reading
I hope you’ve enjoyed this content! Come back for more, eventually, when I get the will to write!
kubebuilder is a front-end for a variety of code generators for Kubernetes resources, primarily for the use of creating Custom Resource Definitions and implementing the Operator pattern. It’s a newer, fancier version of the generate-groups.sh script (with about 100% less cut and pasting, too).
It’s a great way to get started with programming in a Kubernetes environment. It incorporates all the tooling and architecture you need to make code generate properly in Kubernetes into your repository, taking over your Makefile, Dockerfile, etc to provide you with useful defaults.
Setup
First and foremost, kubebuilder will work, by defaultwith the kubernetes cluster configured in ~/.kube/config. It is advisable to install something like https://k3s.io to bootstrap something to play with, if you don’t already have a preferred method. We will be working with Kubernetes 1.18 in this post.
Second, the release of kubebuilder you fetch is important as well; we are using kubebuilder 2.3.1. You can find this release here. Kustomize is also necessary, we fetched 3.6.1.
kubebuilder likes to be unpacked into /usr/local/kubebuilder for the tests, specifically. You can accomplish this like so:
1
$ sudo tar vxz --strip-components=1 -C /usr/local/kubebuilder -f kubebuilder.tar.gz
This will unpack other binaries like a kube-apiserver and etcd as well. Put kustomize somewhere in $PATH.
The Plan
The plan is to update a CRD with a client we create; this client will simply insert a UUID (if possible) with some basic data. We will then explore this data from the kubectl command-line.
All examples will be in golang and use all the traditional k8s.io libraries. You should not need to, but could paste a lot of this code if necssary.
Let’s Initialize Our Repository
First things first, understand that kubebuilder wants to own every detail your repository from the build system, down to the license of the code it generates under. If you don’t want this behavior, creating outside of the standard tree is probably advisable, or outside of the repository entirely, and depending on it instead.
This example removes the license to avoid forcing you to license your own code a specific way, but there are a few options. Every kubebuilder sub-command has a --help option.
1 2 3 4 5
# yes, you should run under $GOPATH. $ mkdir$GOPATH/src/github.com/<your user>/k8s-api $ cd$GOPATH/src/github.com/<your user>/k8s-api # this kubebuilder command will spew a bunch of files into your repository. $ kubebuilder init --domain example.org --license none
You will see some output like this:
1 2 3 4 5 6 7 8 9 10 11 12 13 14
erikh/k8s-api% kubebuilder init --domain example.org --license none Writing scaffold for you to edit... Get controller runtime: $ go get sigs.k8s.io/controller-runtime@v0.5.0 Update go.mod: $ go mod tidy Running make: $ make /home/erikh/bin/controller-gen object:headerFile="hack/boilerplate.go.txt" paths="./..." go fmt ./... go vet ./... go build -o bin/manager main.go Next: define a resource with: $ kubebuilder create api
This sets up a domain (you will get a default if you don’t specify it) for your API which is encoded into the code generation.
If we look at the repository now, quite a bit has changed. We can see a Makefile as well as a bunch of directories:
1 2 3 4 5 6 7 8 9 10
drwxrwxr-x 2 erikh erikh 4096 Jun 28 11:15 bin/ drwx------ 8 erikh erikh 4096 Jun 28 11:15 config/ -rw------- 1 erikh erikh 795 Jun 28 11:15 Dockerfile -rw------- 1 erikh erikh 357 Jun 28 11:15 .gitignore -rw------- 1 erikh erikh 148 Jun 28 11:15 go.mod -rw-rw-r-- 1 erikh erikh 44135 Jun 28 11:15 go.sum drwx------ 2 erikh erikh 4096 Jun 28 11:15 hack/ -rw------- 1 erikh erikh 1444 Jun 28 11:15 main.go -rw------- 1 erikh erikh 2069 Jun 28 11:15 Makefile -rw------- 1 erikh erikh 64 Jun 28 11:15 PROJECT
Creating the API
This is the build system for your API; it hasn’t even arrived yet! We need to run another kubebuilder command to create it. We need to pick an API group and kind first; we’ll use “apis” and “UUID” respectively.
We’ll need both the resource and the controller for publishing our resource changes in the client; if we don’t provide these options, you will be prompted for them.
1 2 3 4 5 6 7 8 9 10
erikh/k8s-api% kubebuilder create api --version v1 --group apis --kind UUID --resource --controller Writing scaffold for you to edit... api/v1/uuid_types.go controllers/uuid_controller.go Running make: $ make /home/erikh/bin/controller-gen object:headerFile="hack/boilerplate.go.txt" paths="./..." go fmt ./... go vet ./... go build -o bin/manager main.go
Making the API do what we want
Our task is fairly simple here; we’re going to edit some struct properties, and move on to making our client.
Let’s first look at our above-noted api/v1/uuid_types.go:
// EDIT THIS FILE! THIS IS SCAFFOLDING FOR YOU TO OWN! // NOTE: json tags are required. Any new fields you add must have json tags for the fields to be serialized.
// UUIDSpec defines the desired state of UUID type UUIDSpec struct { // INSERT ADDITIONAL SPEC FIELDS - desired state of cluster // Important: Run "make" to regenerate code after modifying this file
// Foo is an example field of UUID. Edit UUID_types.go to remove/update Foo string`json:"foo,omitempty"` }
// UUIDStatus defines the observed state of UUID type UUIDStatus struct { // INSERT ADDITIONAL STATUS FIELD - define observed state of cluster // Important: Run "make" to regenerate code after modifying this file }
// +kubebuilder:object:root=true
// UUID is the Schema for the uuids API type UUID struct { metav1.TypeMeta `json:",inline"` metav1.ObjectMeta `json:"metadata,omitempty"`
Spec UUIDSpec `json:"spec,omitempty"` Status UUIDStatus `json:"status,omitempty"` }
// +kubebuilder:object:root=true
// UUIDList contains a list of UUID type UUIDList struct { metav1.TypeMeta `json:",inline"` metav1.ListMeta `json:"metadata,omitempty"` Items []UUID `json:"items"` }
This is what it should look like (roughly) when you view it. We’re going to make a slight modification to UUIDSpec and leave the rest alone.
Let’s change the inner struct body to look something more resembling this:
1 2 3 4 5
// UUIDSpec defines the desired state of UUID type UUIDSpec struct { UUID string`json:"uuid,omitempty"` RandomInt int`json:"random_int,omitempty"` }
Once this is done, type make at the root of the repository. Try make test, too. This will generate your code and keep everything up to date.
To install your CRD on to the cluster, type make install. Do this now, as it will help with the next step.
Finally, the Client
The client leverages the controller-runtime client to interact with your types in a way that makes Golang happy. The code has no idea about your type until the point they’re compiled together; this abstraction allows them to import and work with nearly any type and the same client.
We first get our Kubernetes configuration from ~/.kube/config. If you don’t like this path, change it here, as credentials will be loaded and servers will be used from this configuration. However, if you have followed the steps so far, this is what you have already been using.
We generate a UUID. There are numerous packages for this; we are using github.com/google/uuid for our generation.
We construct our object with the UUID represented as string and a random integer because we can. It’s not very random.
Next we set the namespace and name, two required arguments for any namespaced object in the Kubernetes ecosystem.
We now take a runtime.Scheme, and append our API to it. We then use the runtime.Scheme in our controller-runtime client.
Finally, we tell the client to create the object. Any error about the name of the object or contents will appear in this step.
Building and Running the Client
Try this:
1
2
3
4
$ mkdir /tmp/k8s-client
## copy in the contents to /tmp/k8s-client/main.go
$ cd /tmp/k8s-client
$ KUBE_NAMESPACE='my-namespace' go run .
On success, no output is returned.
Validating we got our data in
To validate our data has indeed arrived, let’s check it out with the standard tools instead of building our own orchestration. CRDs have the added benefit of being integrated and controllable directly from the standard API, making them accessible with tools like kubectl.
Let’s try that (I ran it a few times, you should see one for each time you ran it successfully):
1
2
3
4
$ kubectl get uuid -n runs
NAME                                   AGE
b97e07ab-2399-4100-879f-0e3049971552   19m
f213c804-3a8a-4e80-804a-368ff9d5a8d8   18m
Let’s describe one to see if we got our random integer:
We can see that indeed, not only is our random integer there, but it is quite large too. What’s also important is that we can see the update manifest of the item, this would be useful for auditing a badly behaving application or user.
kubebuilder == rails new
kubebuilder, as we saw, is basically rails new for Kubernetes. Those of you familiar with the ruby/rails ecosystem may be familiar with this being a single command to generate giant swaths of code to edit later. I imagine it’s scope will expand to handling other patterns in Kubernetes and I look forward to using it for future projects.
I’ve put the code I generated here, if you want to pull it down to play around. Enjoy!
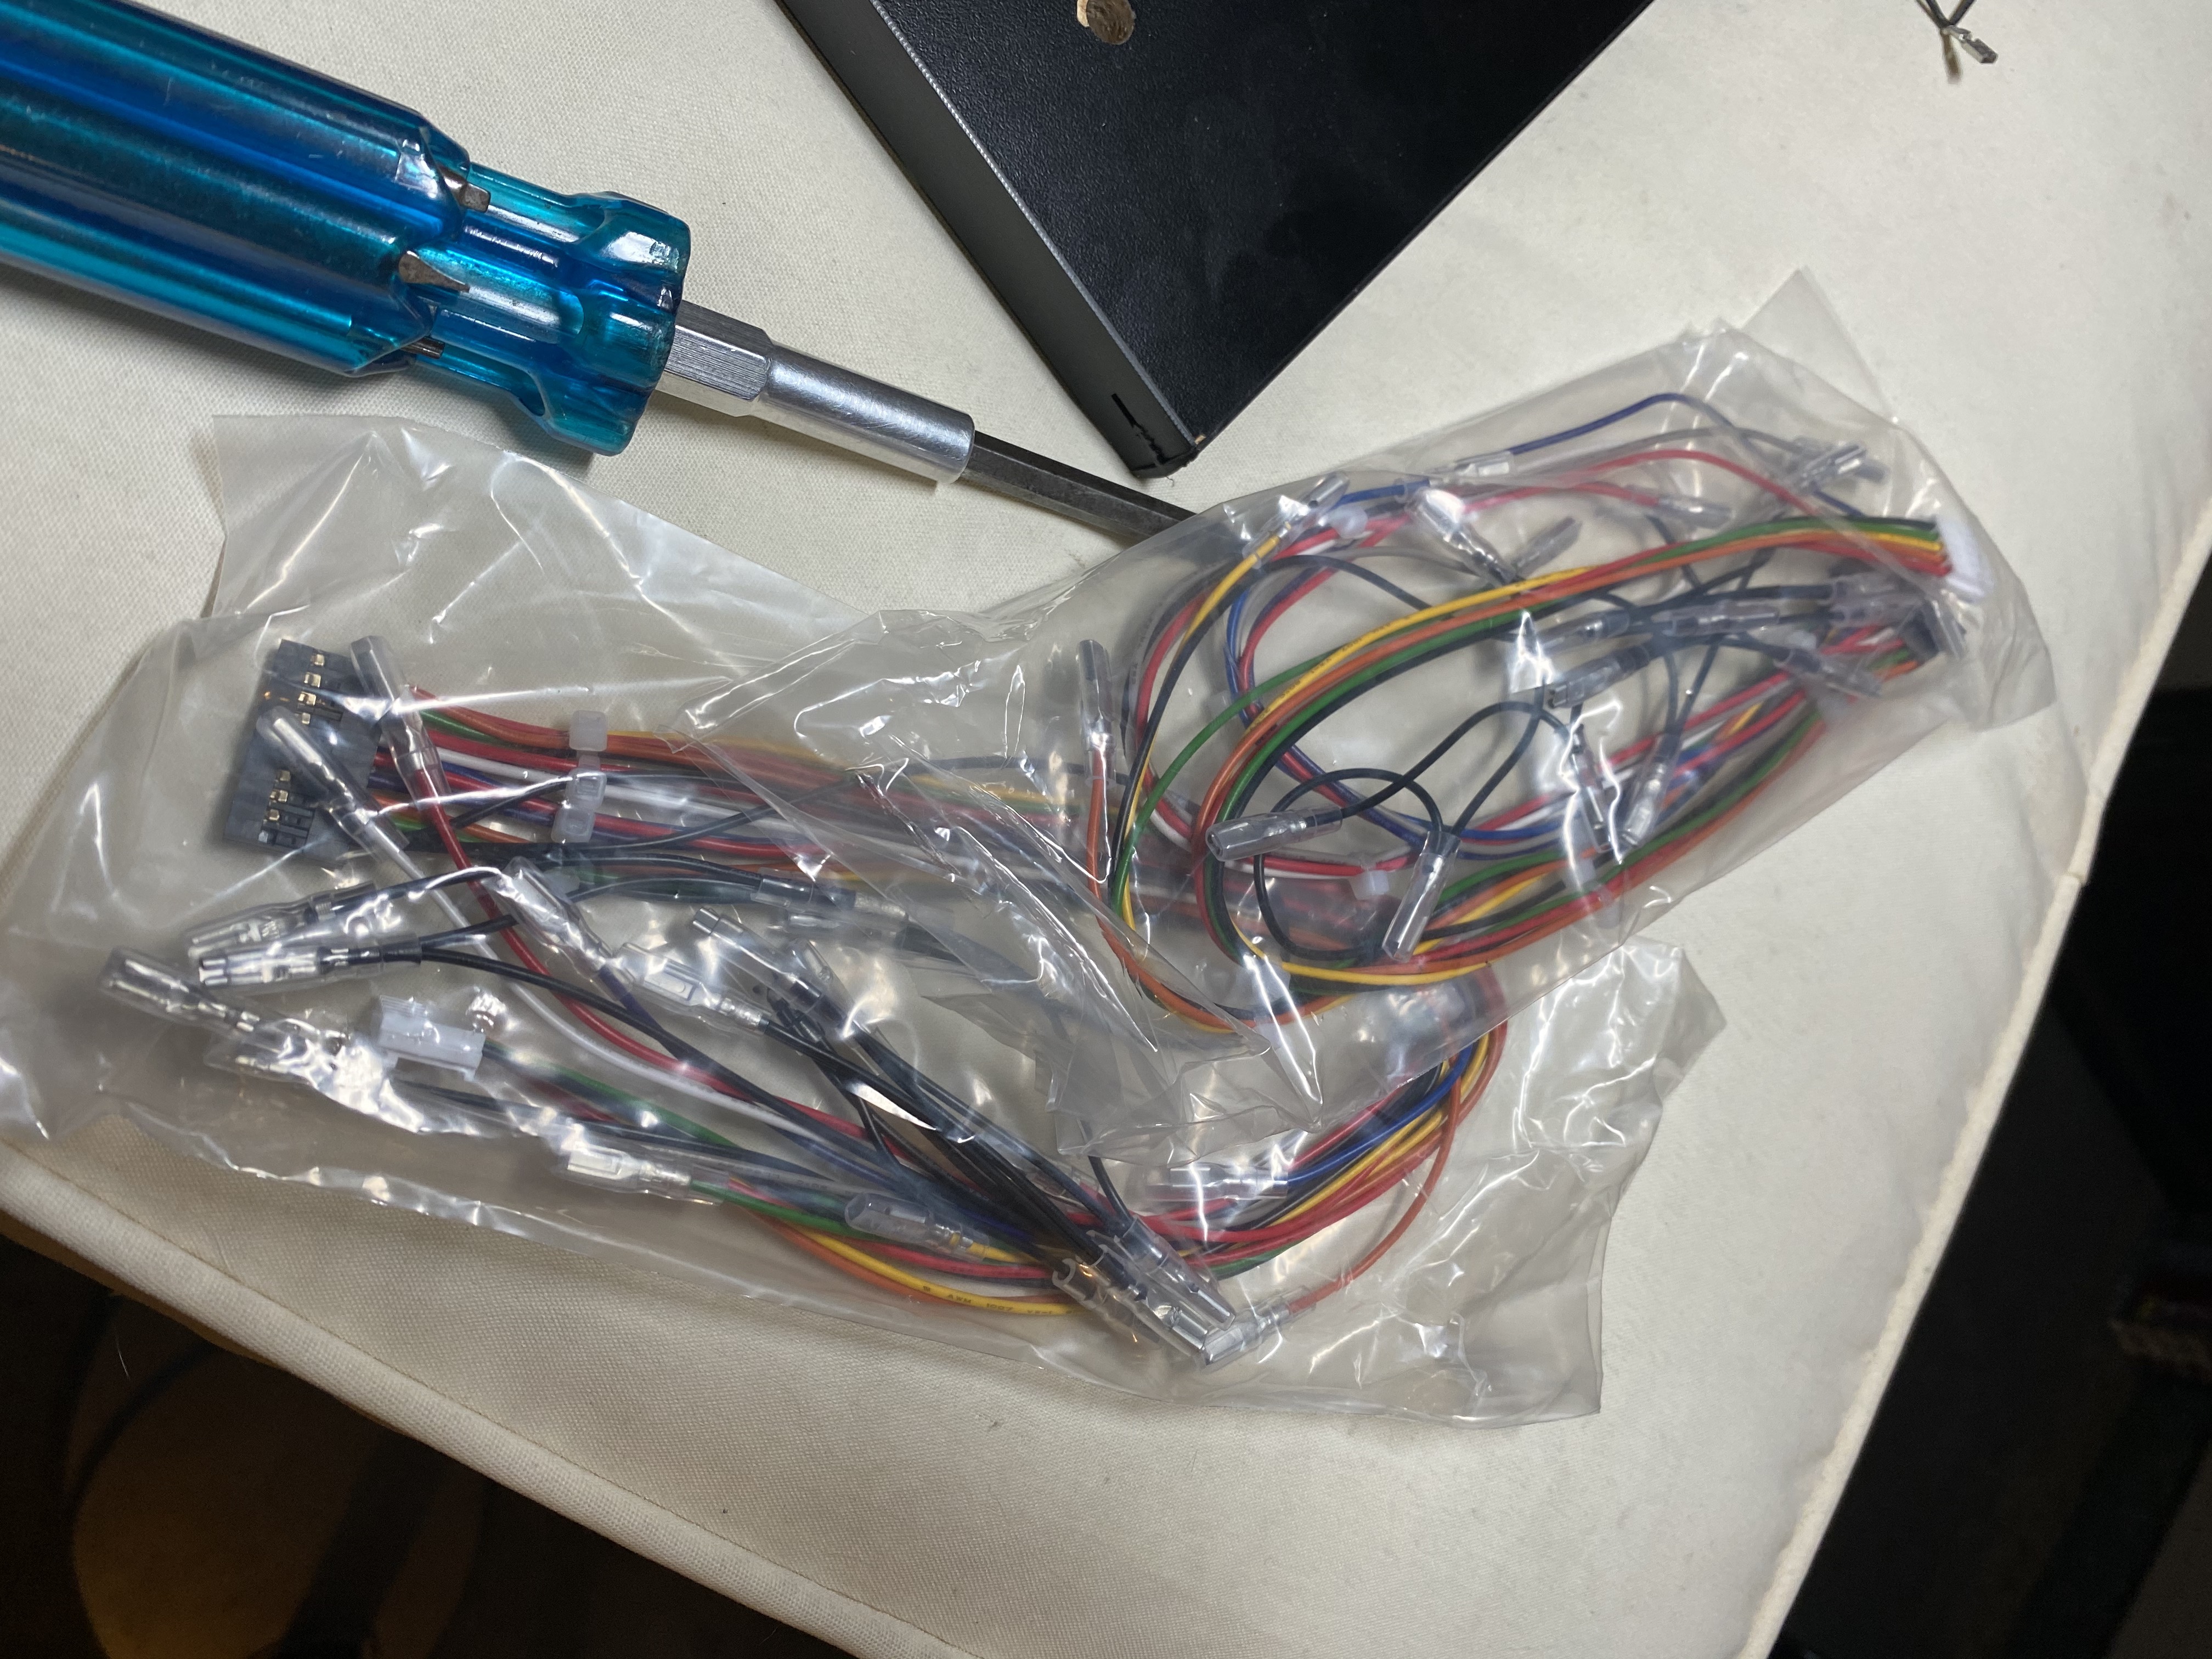
One of my personal hobbies is to spend a lot of time fretting over arcade sticks. I enjoy playing platformer-style — Metroidvanias mostly — video games on an arcade cabinet. It’s weird and I revel in my weirdness.
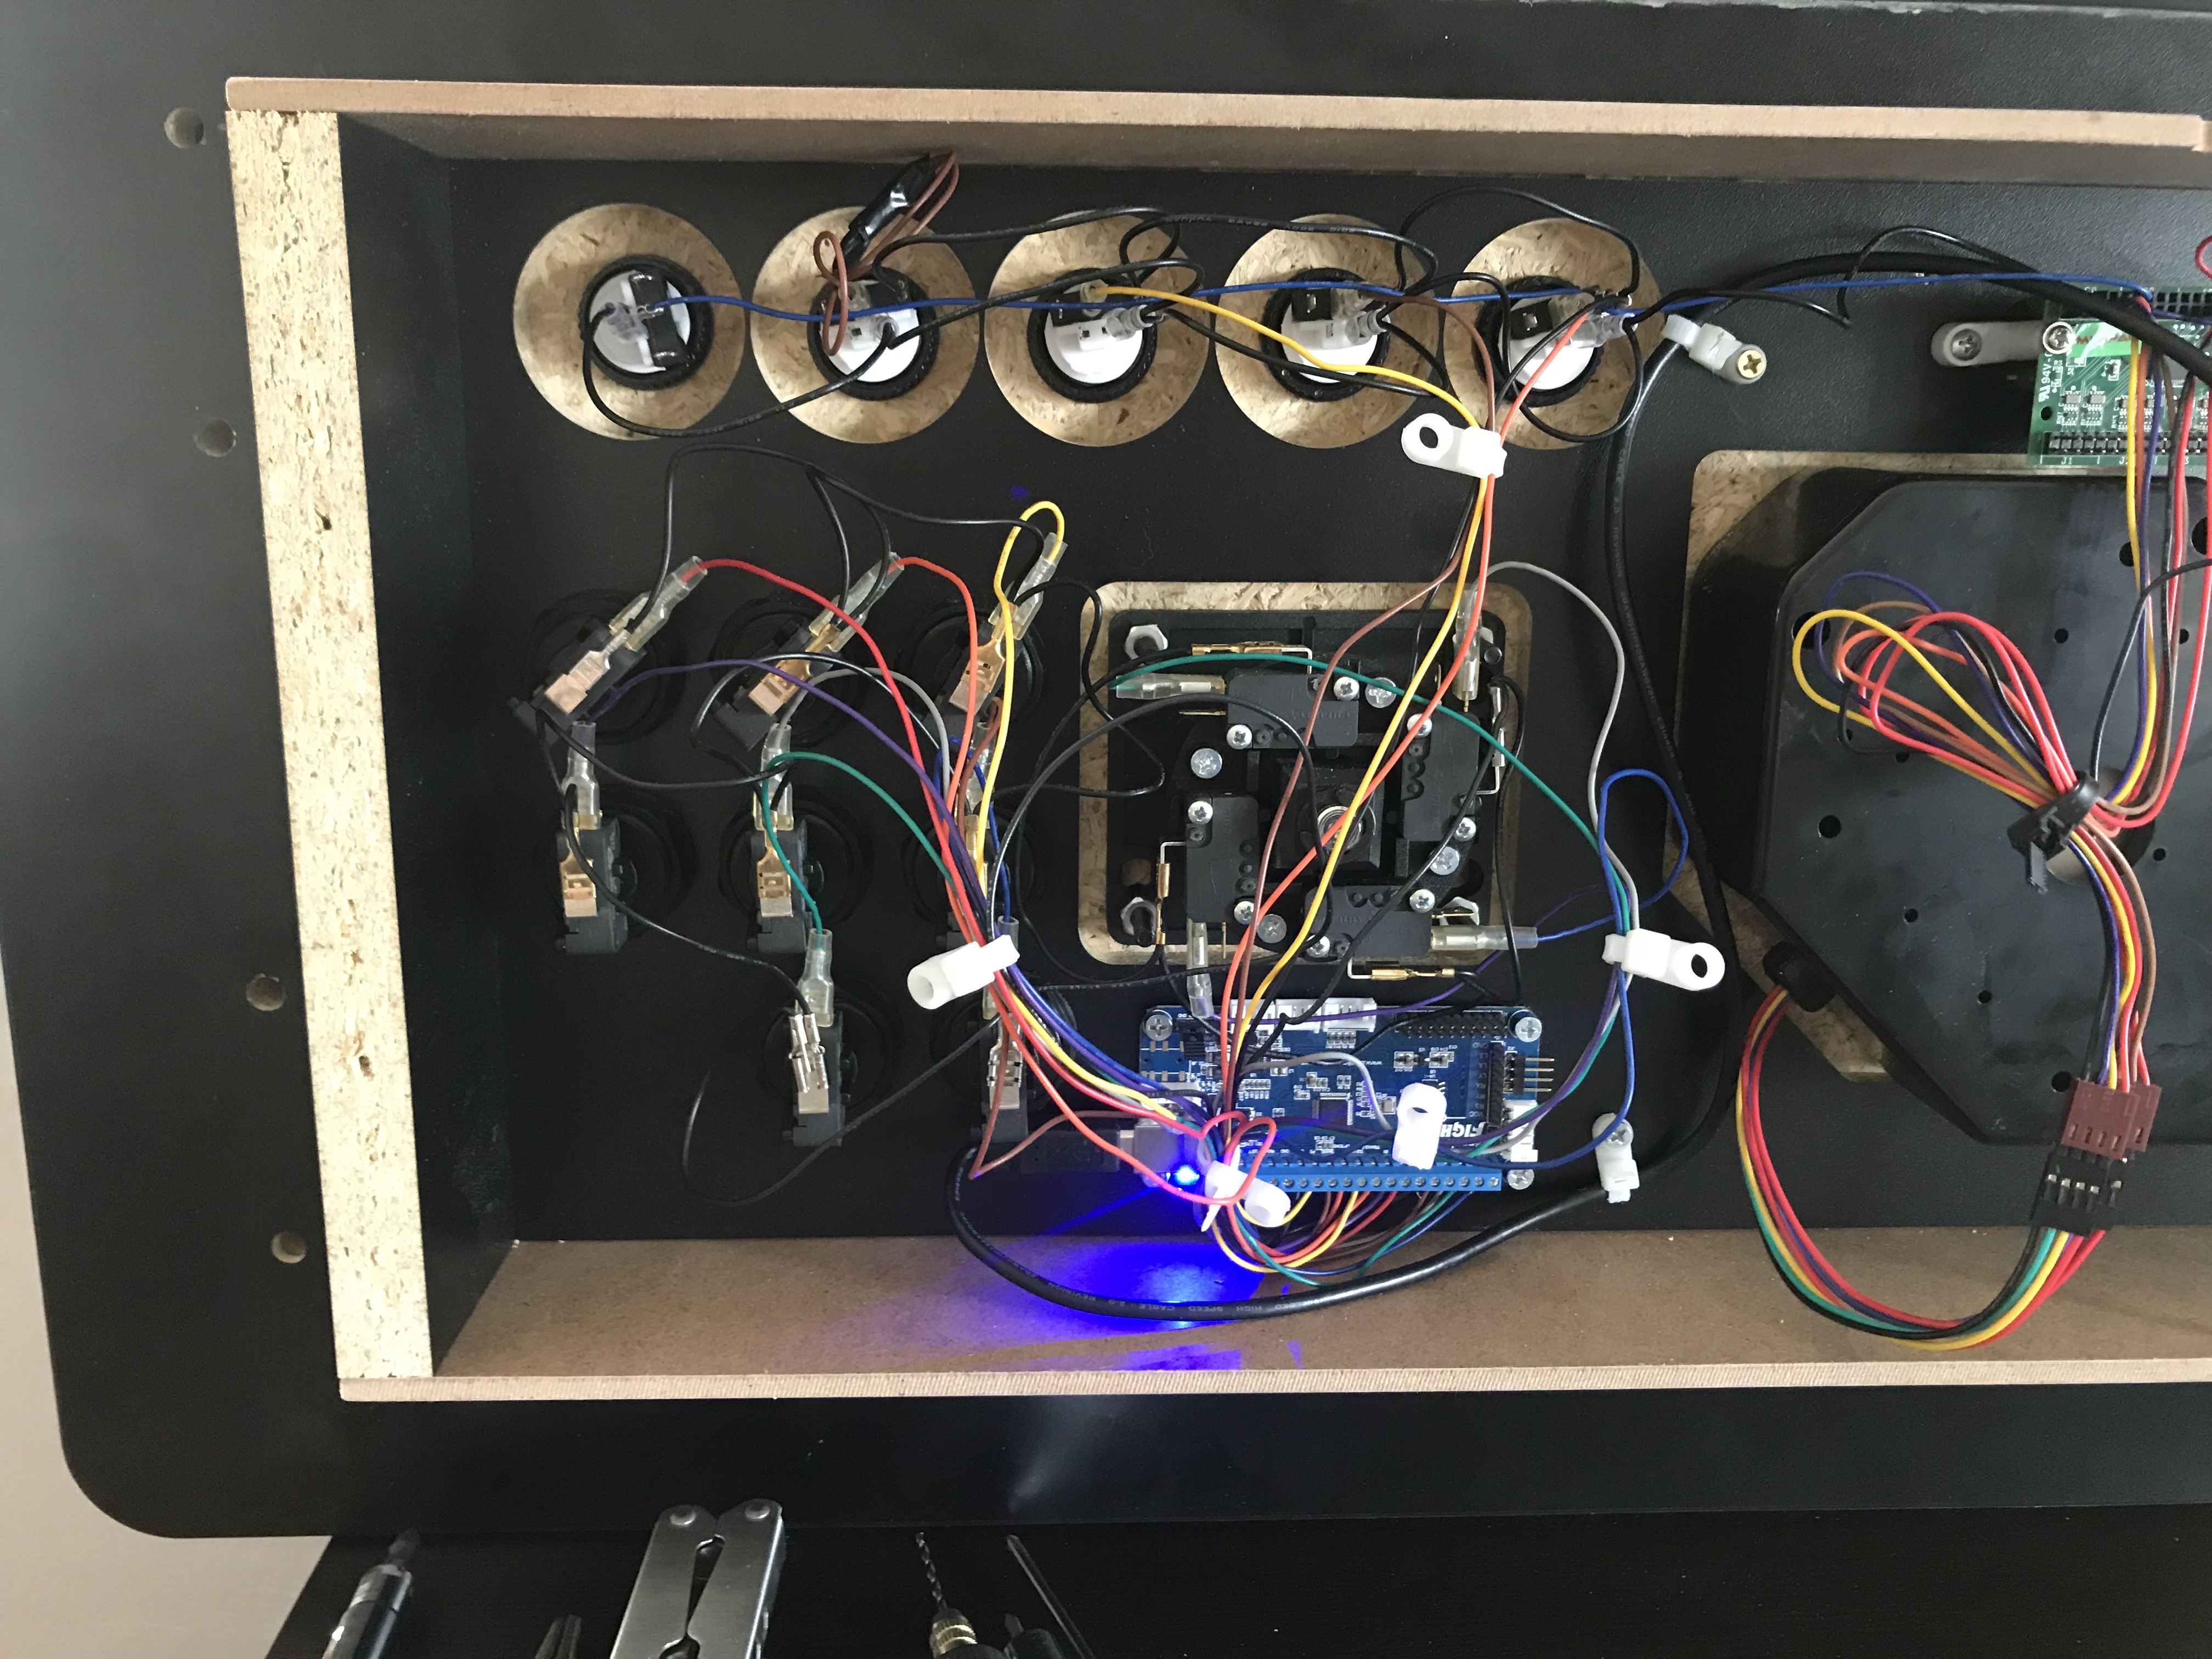
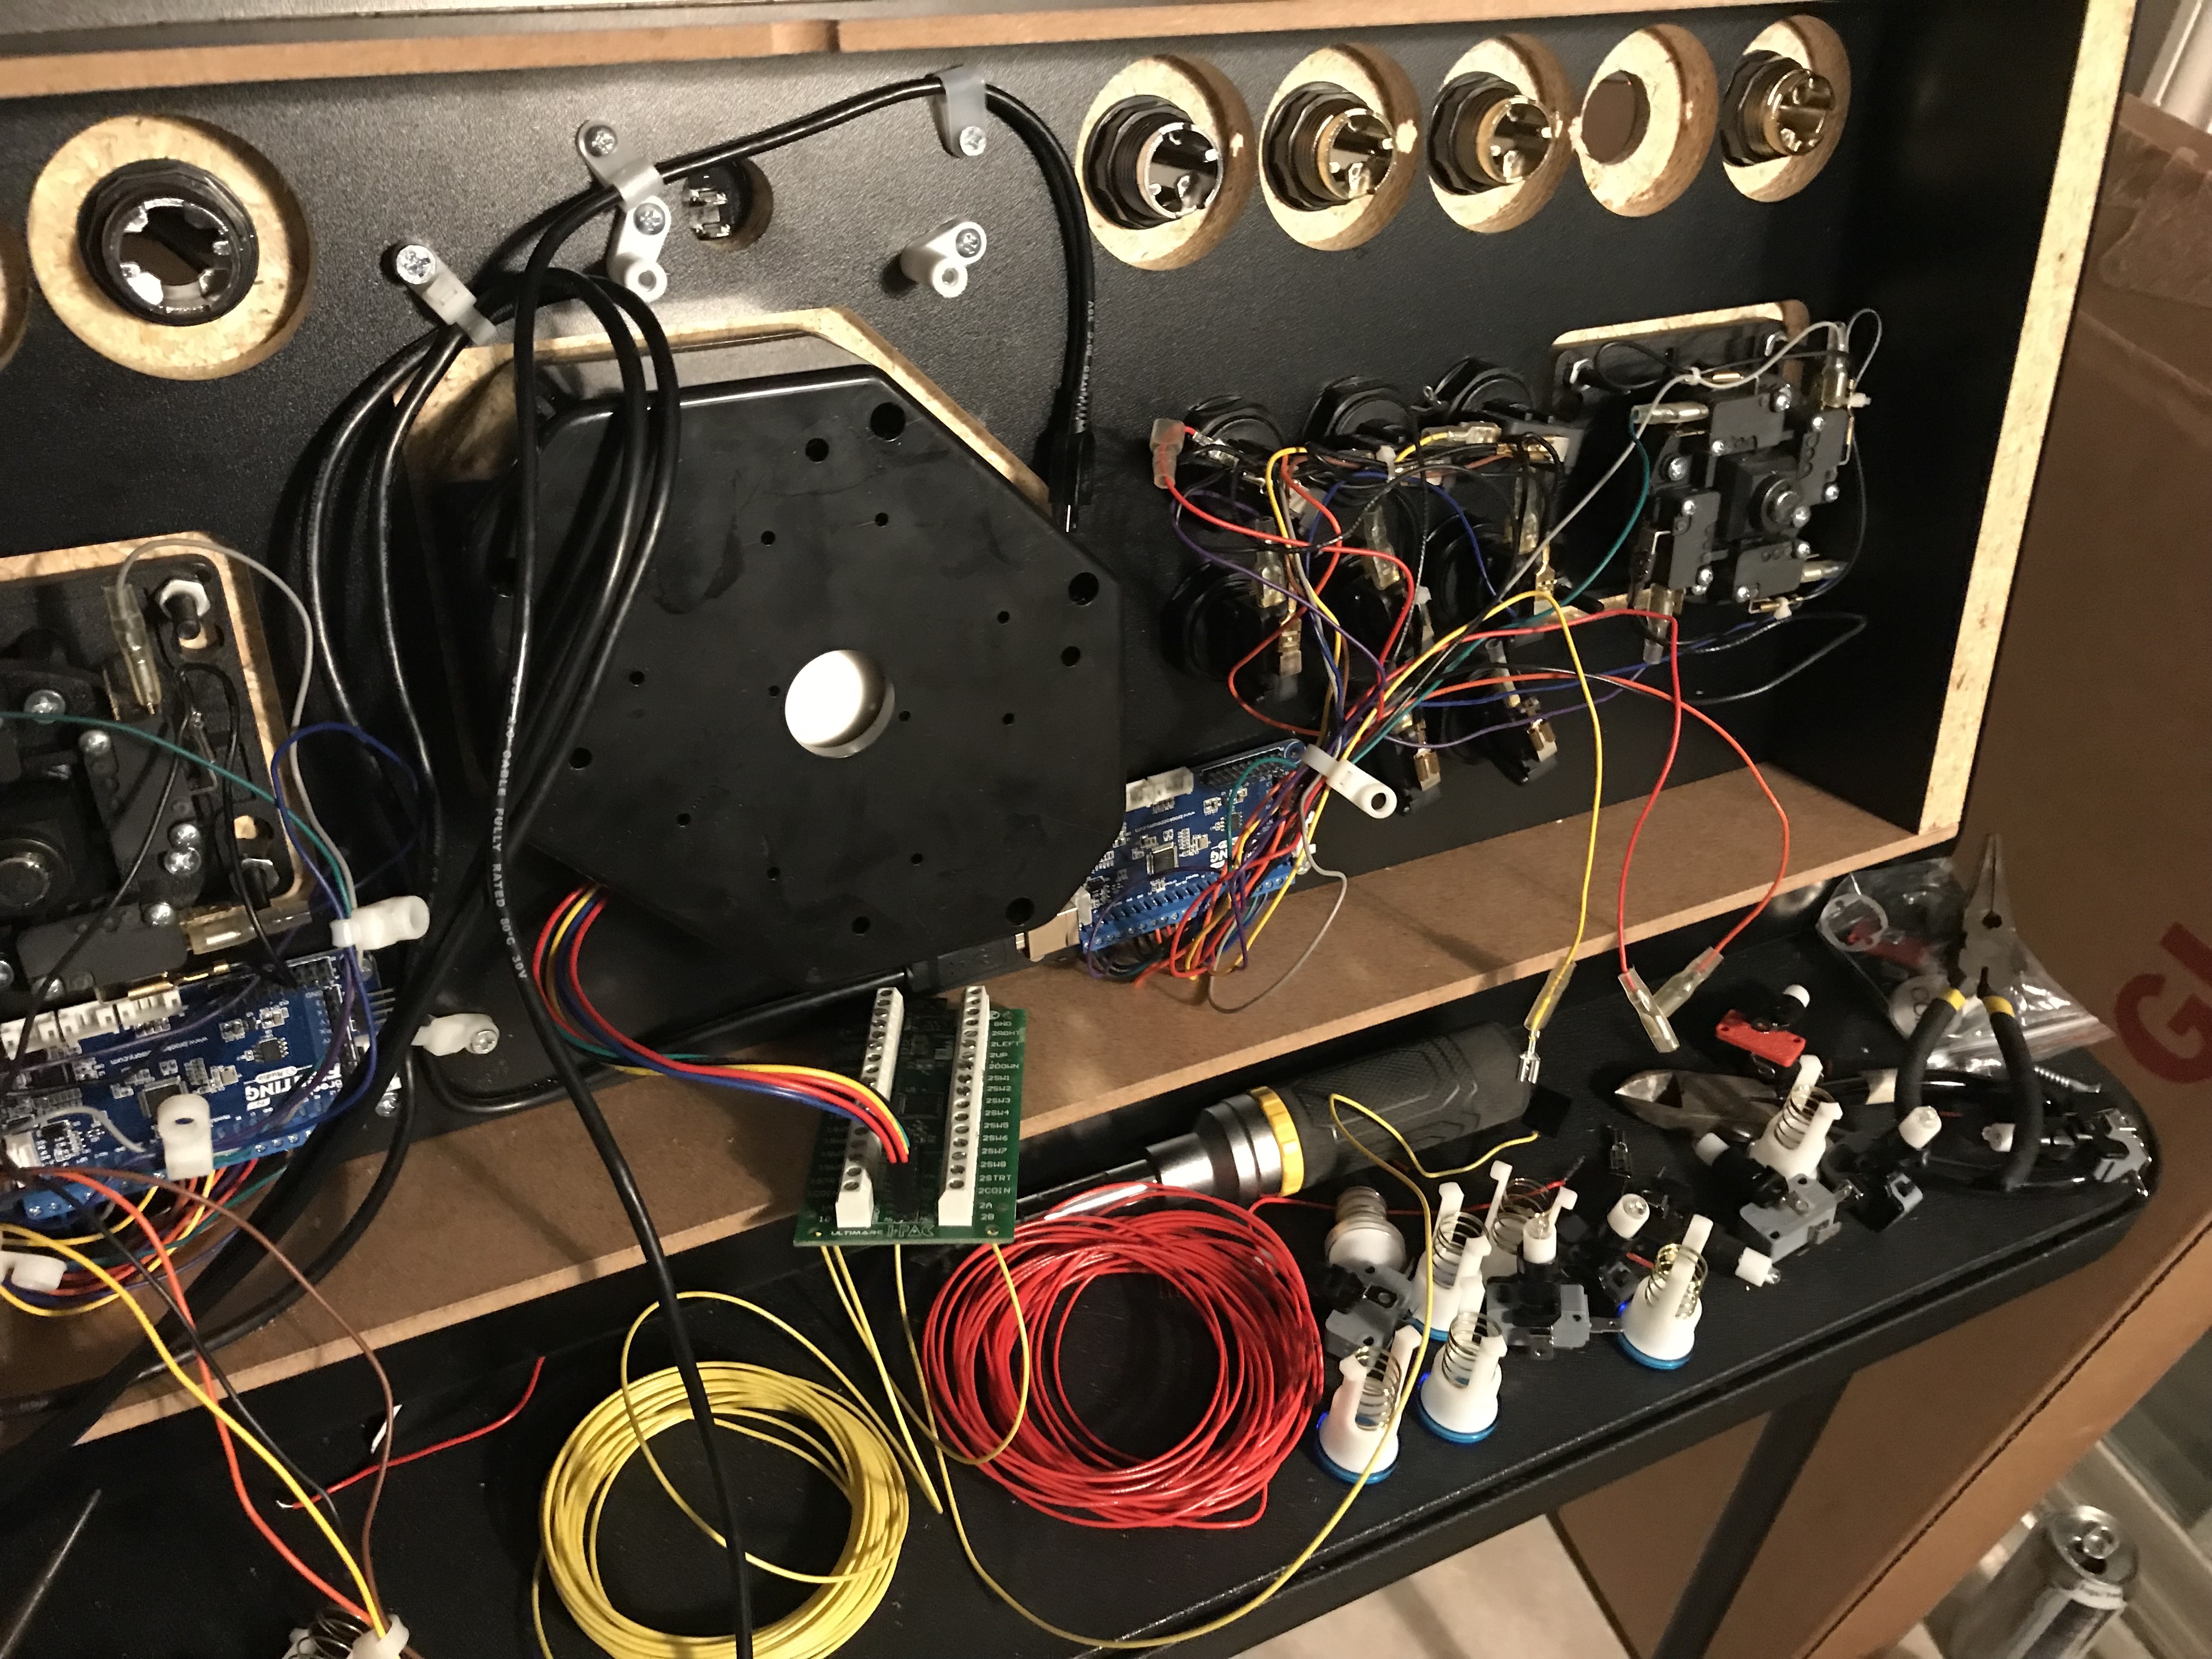
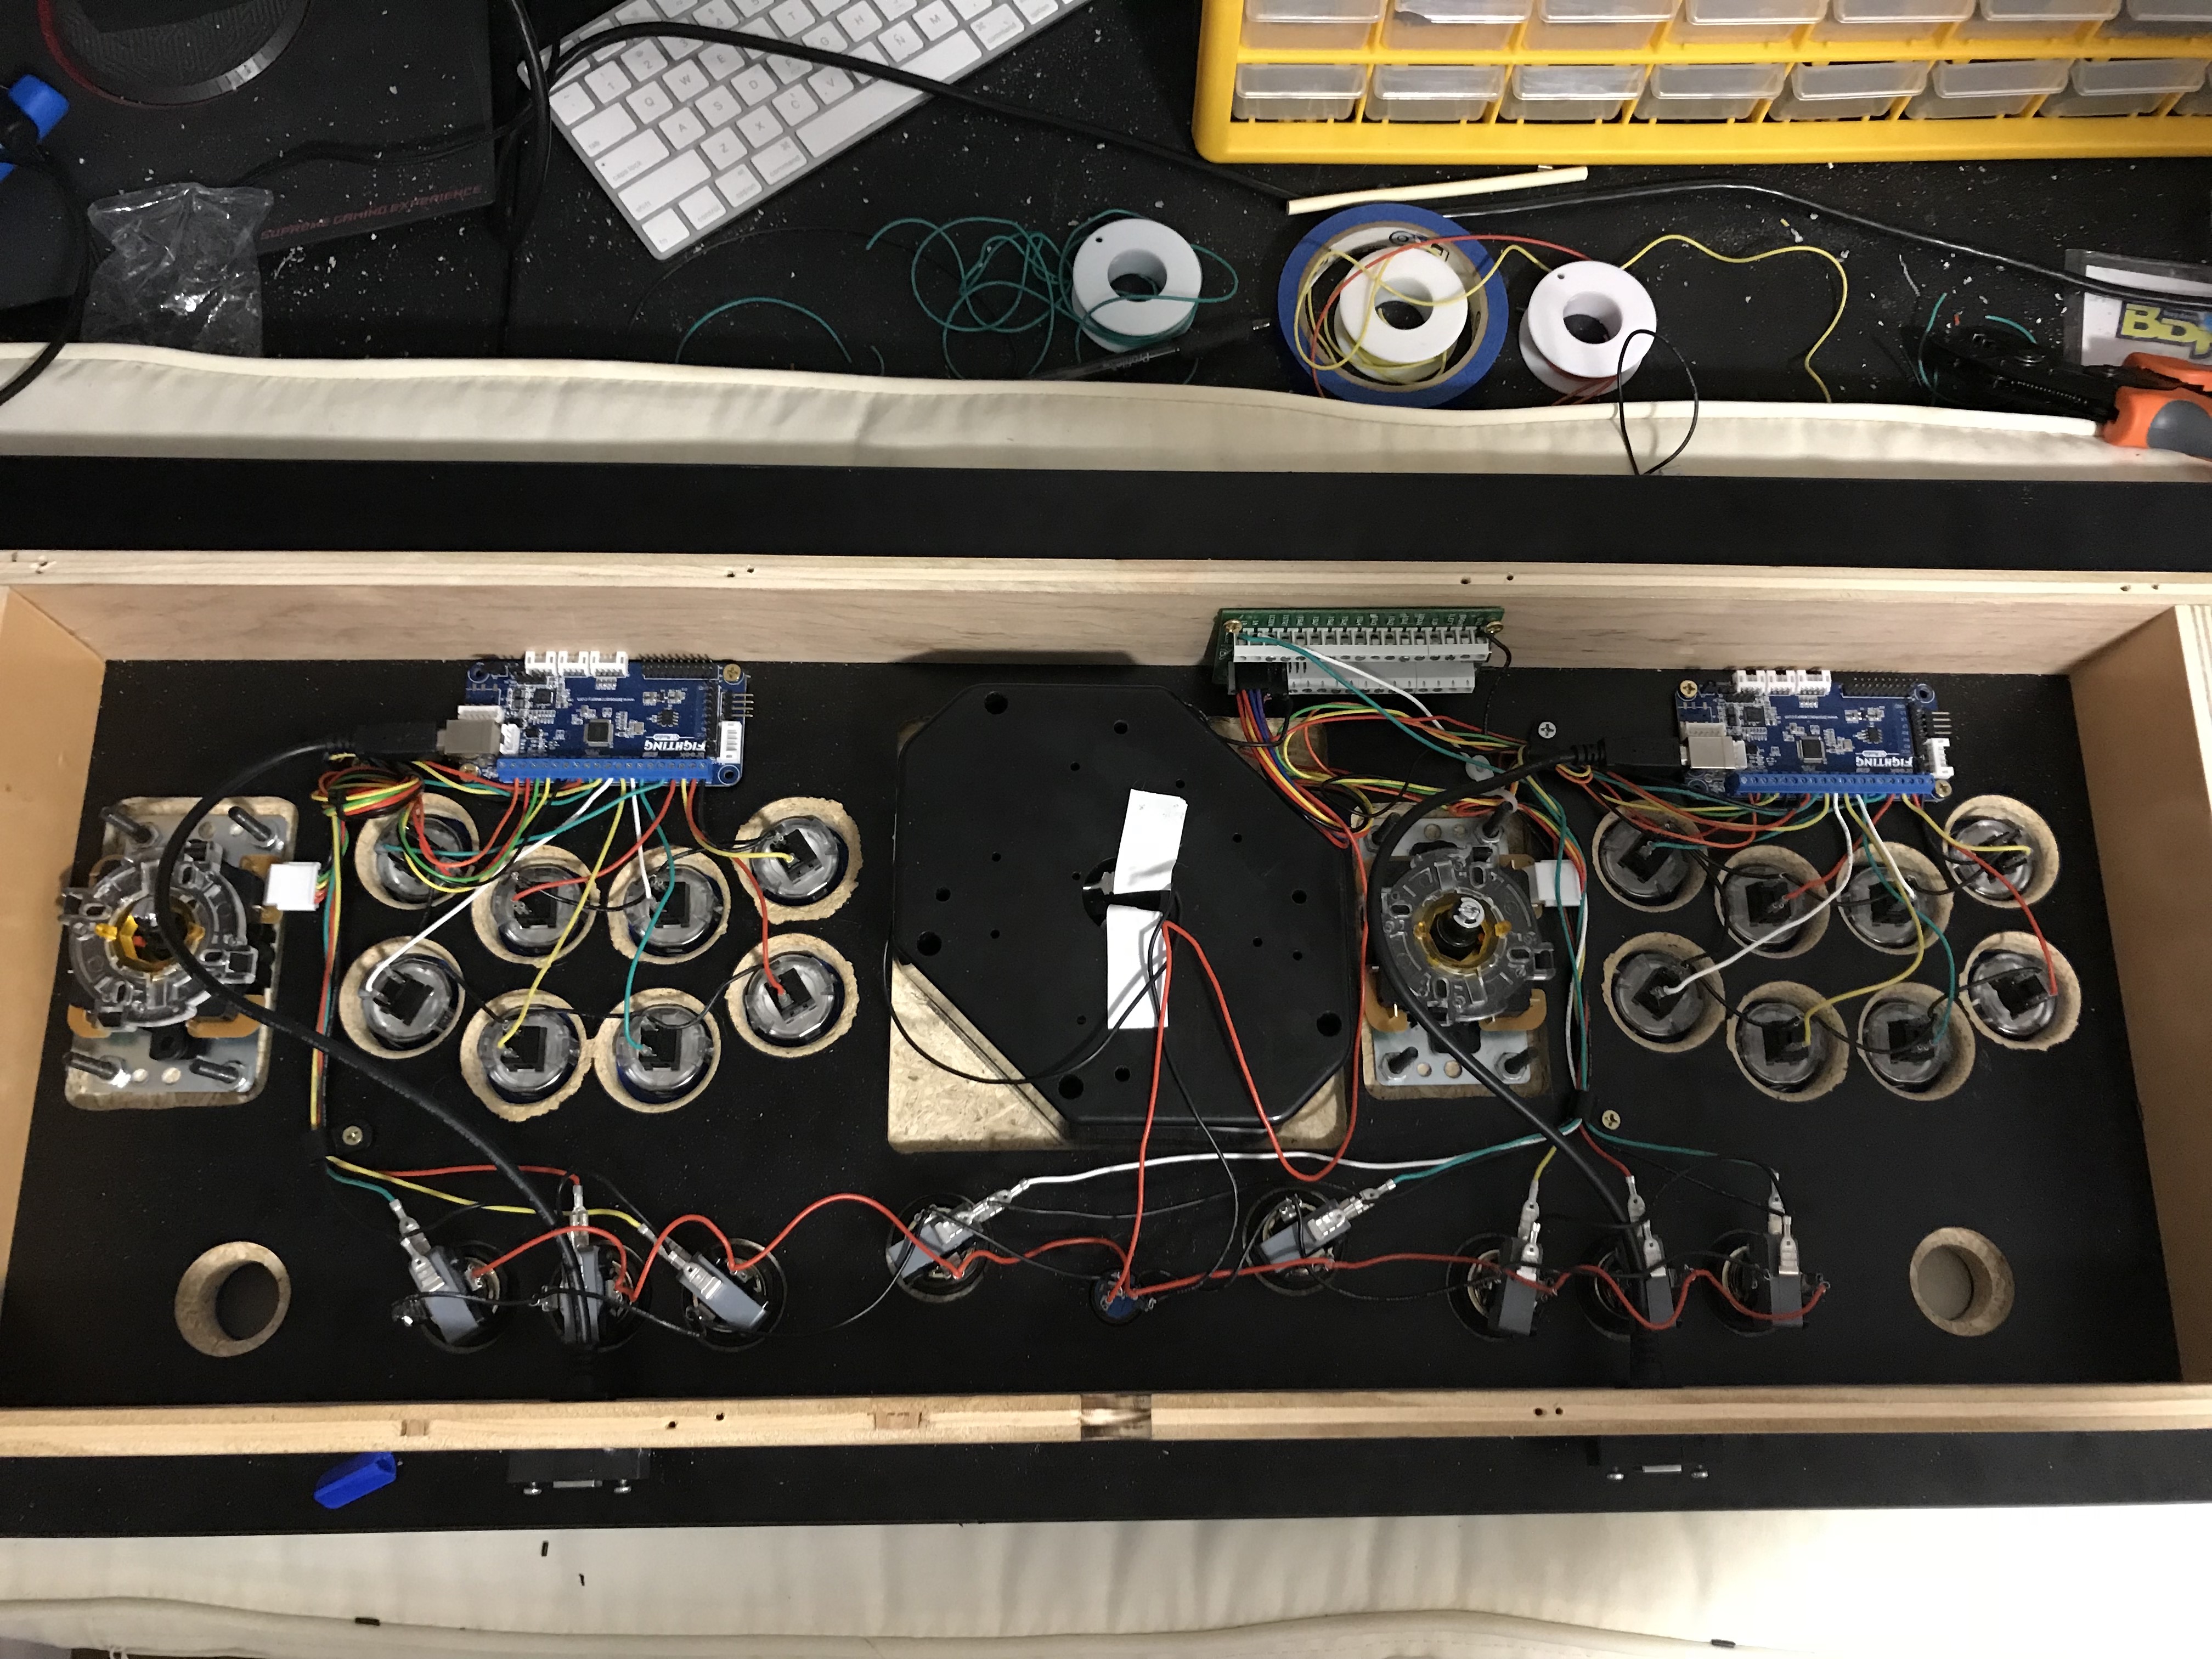
The control board for my stick has been a work in progress for years now. I have a lot to share now that it’s largely a completed work, along with the cabinet itself.
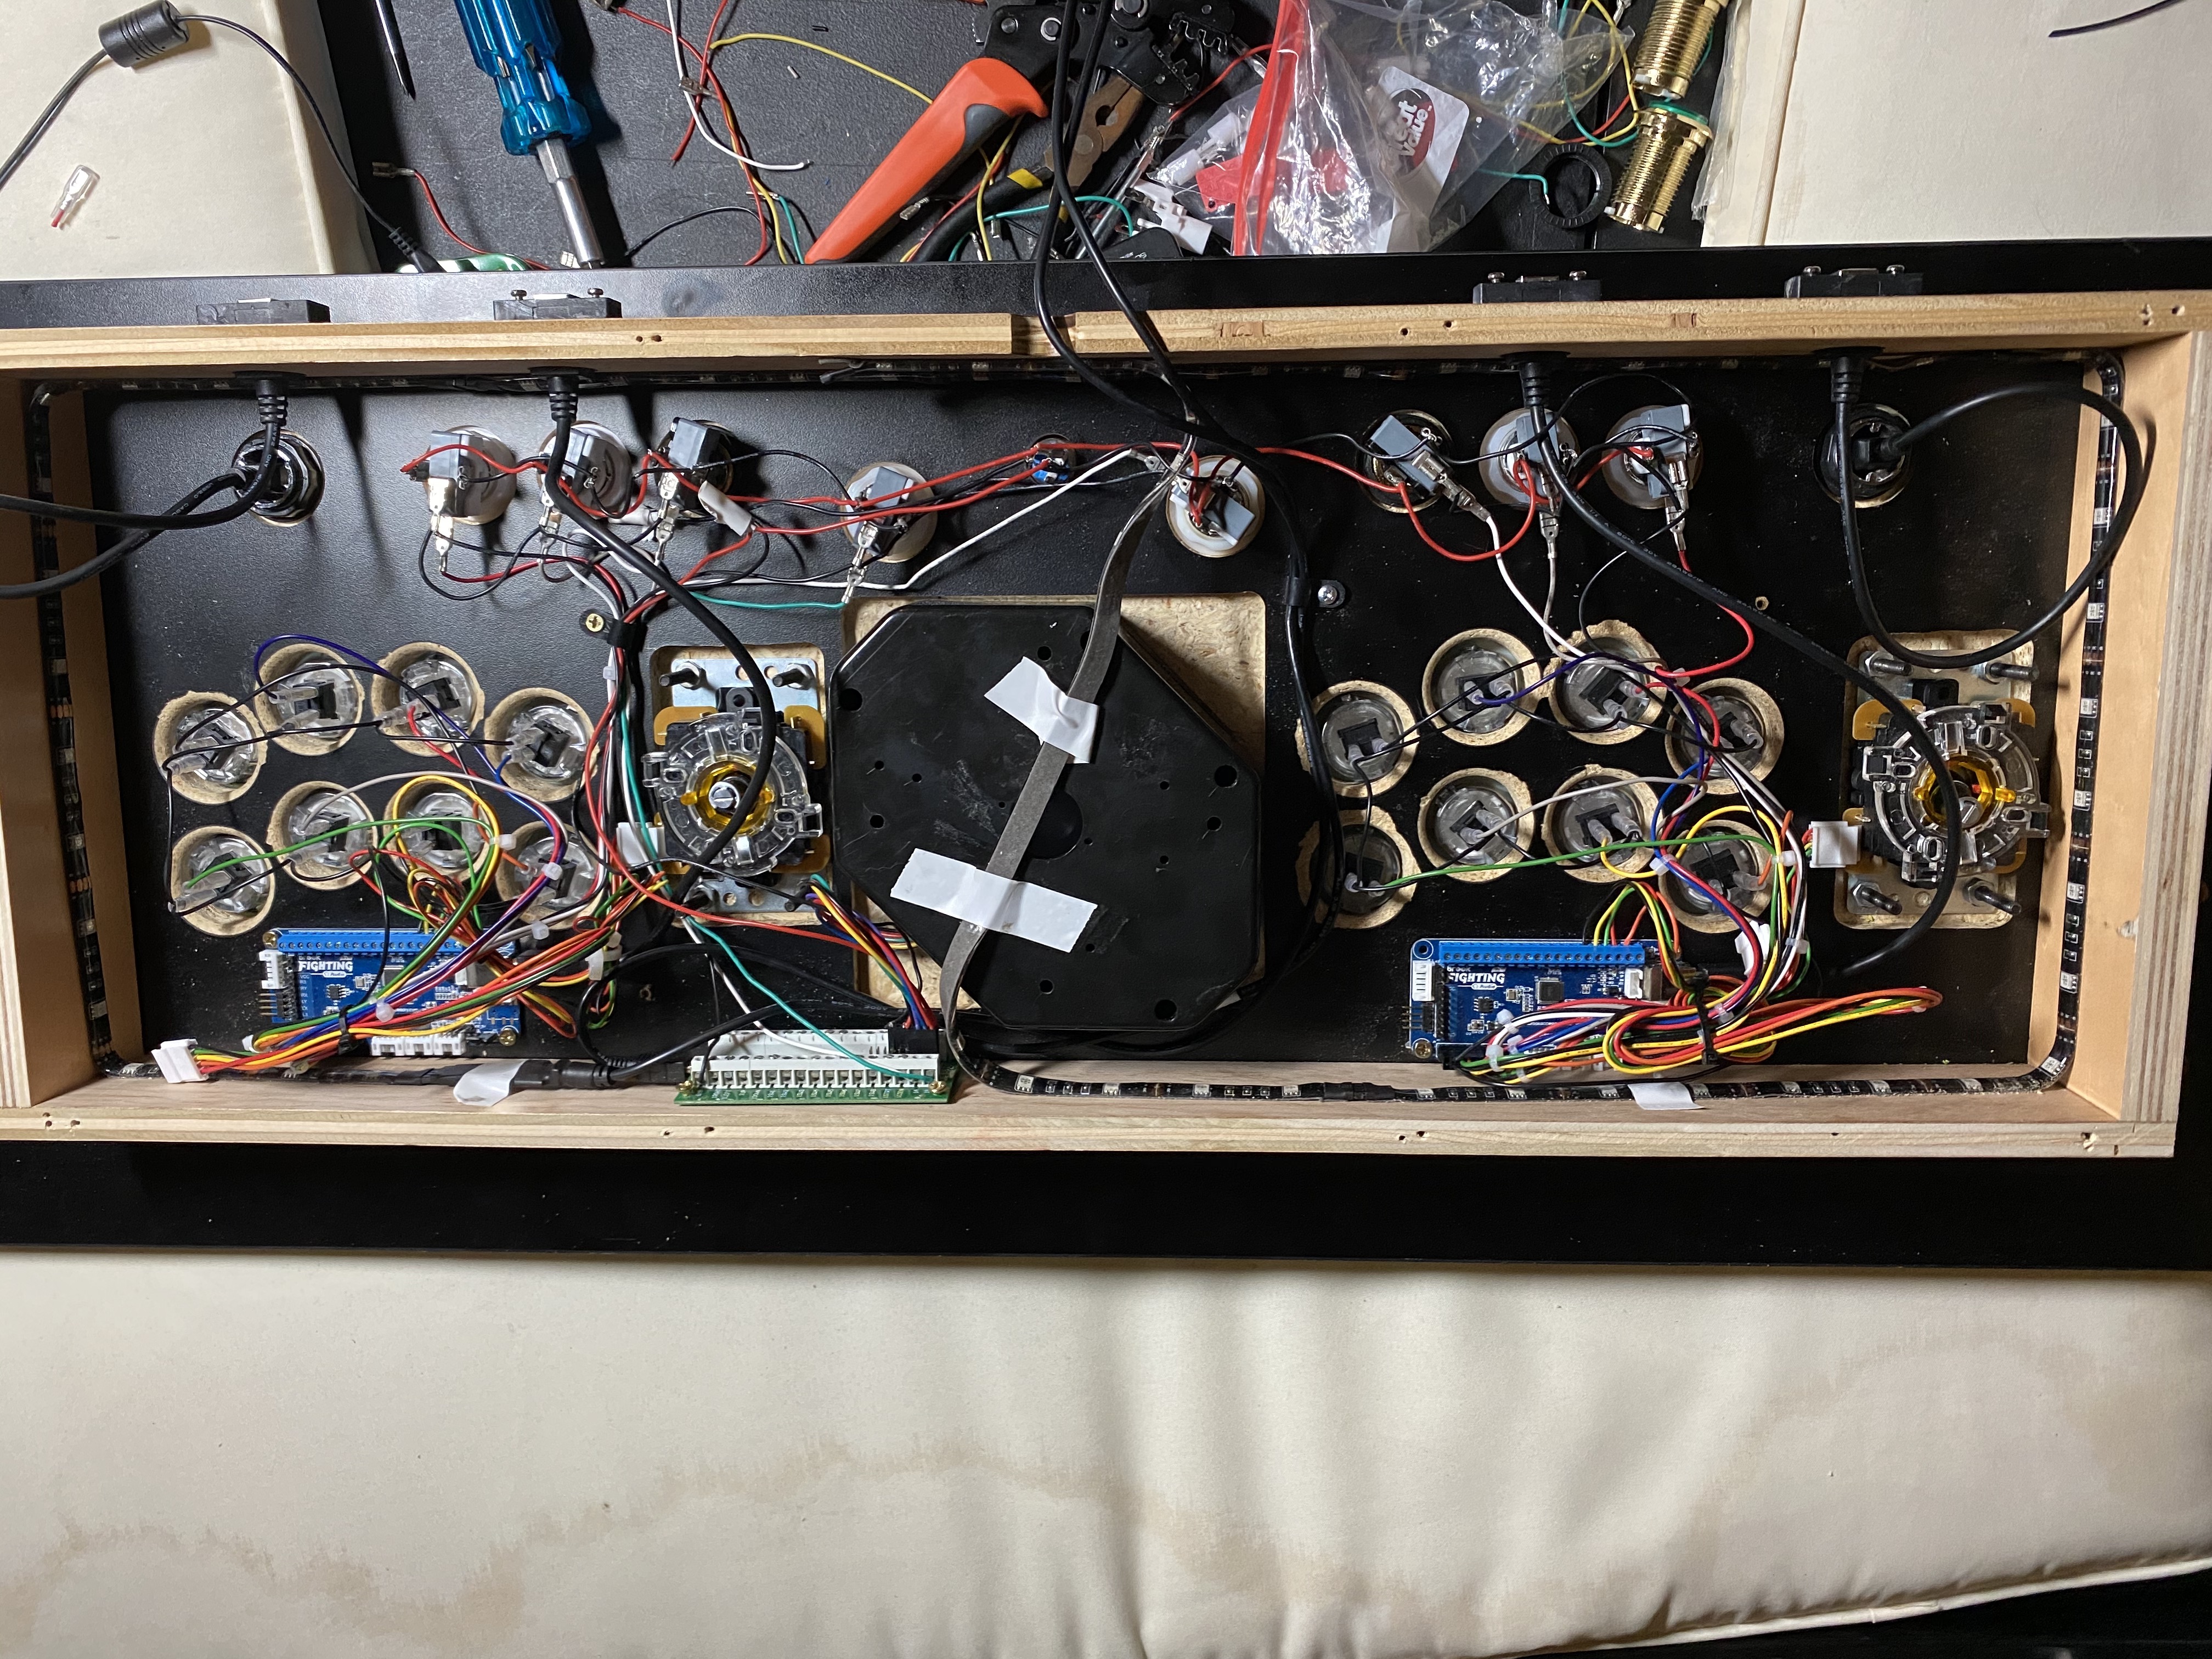
My first control board
My first control board was a RecRoomMasters Xtension Pro Emulator Edition, pictured below in the cabinet. For some reason, I don’t have a close picture of the original before I modded it.
Naturally, I had to take this apart at some point. So here’s the inside about a day later:
The sticks and buttons are original Suzo/Happ parts. They are connected to a Mini PAC along with a U-Trak and some additional buttons for left and right mouse.
Pictured is an iPac 2, largely because my scenario involves a lot of steam’s big picture mode, which works best with the XInput Standard used by most xbox-compatible controllers. The iPac offering allowed for two adapters to provide the XInput emulation.
The problem with keyboard emulators
They are brittle. Keyboard emulation mapped to an xbox controller usually involves software to map the keyboard inputs to controller presses, which don’t really map equally. The controller press & release action are single events in most games, whereas with a keyboard, press+hold is actually just repeating the keypress. Emulation software that maps this listens for this repeat.
This creates ghosting and latency/performance problems in your inputs. That’s fine for Pac Man but not for Mega Man.
The iPac, as previously mentioned, provided the promise of these xinput emulators that never quite worked right. They were plugged into the extension ports of the ipac2, and always competed — even when plugged into the same board! — for first player slot. They were also ridiculously expensive at $30 apiece.
I found these boards to be the solution to most of the problems I had running a dual-stick control board on windows with steam. They will still have problems selecting first player if not massaged right (which is not hard to do with a few “konami codes” they baked in) but that’s because of windows, not them.
The boards function like real xbox controllers, they do not fall apart because some software crashed.
When I learned of the Brook boards I rewired most of the stick for the first time. I also installed some USB buttons (more below) as well as LED buttons in the top. Pictured is some of the work.
USB Buttons
USB buttons were really fun to fabricate; my wife Max helped me do this work. So the net result is the combination of a hollowed out arcade button housing and a slightly modified Neutrik connector for USB B->A adapters. This allowed me to keep consistency with the other type B interfaces (the brook boards) in the control board which mattered later when I built a breakout in the back of the wood for connecting to the rest of the arcade.
Also pictured here are the addition of Sanwa JLF sticks, which are much less tense than the Happ sticks, providing a better feel for me. I found them much nicer in platformers to use. I found some adapter plates made by KOWAL on https://focusattack.com to fit the Sanwa joystick mount into the Happ-compatible control board mount, which is larger. You can also see the lighting on the buttons.
Cabinet Art & Color Change
The cabinet art was also done by Max, and is largely mentioned because it resulted in a color scheme change with the buttons. This is this the first time I really started playing with the artistic properties of the control board, which I started to become obsessed with eventually.
We went with a theme centered around Adventure Time’s character BMO, and this will creep slower and slower into our article as we venture down that transformation.
Phase 2: The full build
After doing all this with my stick I really disliked a lot about the Xtension Emulator Edition stick. The button layout in particular with the three rows was unwieldy especially for fighting games, but also for games like Dead Cells which use the entire controller. While I could have drilled two more holes, that would have left the bottom holes empty and would have collided with the trackball.
A full cut pictured below was made by Ximao Miao, a friend (linked are some of his works in silver). The cut includes a 2x4 button layout, more definition between the control buttons and the USB ports, and support for mouse buttons near the trackball.
A laser cut acrylic piece was made by Ryan Acks for a small fee. The acrylic in this case is what actually holds the Sanwa OBSF snap-in buttons. The acrylic is 1/8” thickness which is what the buttons need to “snap”. Since we went with metallic silver for the color, these are actually the 30mm OBSJ models. Green LED buttons are still used at the top. A new silver/green LED latching push button switch is installed to mimic the BMO theme and control the lighting.
The wiring here is some of my proudest. I am not especially good at this but I feel I did well in this iteration.
The Art’s next; but first, a diversion
So this happened, and we all took a break for a bit:
(This is my lame excuse to slap you in the face with a kid photo.)
Finally! The art.
The art installation was done in the last week. I think it came out great. Max again did the artwork on poster board, with acrylic paint. I rewired most of the stick as well as repaired the joysticks.
This time I didn’t want to fiddle with the wiring. Luckily, https://focusattack.com has pre-wired harnesses for the Brook boards I use, so I purchase two of those and modified them to work with the LED buttons, which use a .187 connector (sanwa OBSF buttons use a .110 connector, so the harness only has those connectors).
Here’s close to the final wiring job. I felt I was lazier this time but also spent less time on it (because I had less).
Here’s the final cabinet in all it’s glory:
Thanks
This was a 3 year trip and I learned a lot along the way. Thanks for indulging me by reading it.